3 posts tagged with "kubernetes"

View All Tags

Developing APISIX Ingress Controller with Nocalhost in Kubernetes

Garry Chen

Garry Chen

Product Manager at Nocalhost Team
Introduction#

This article walks you through using Nocalhost to seamlessly connect your local development machine to a remote Kubernetes cluster, allowing you to use your favourite IDE to develop and debug Apache APISIX ingress controller. Giving you the ability to comfortably develop and debug your remote apps with your existing skills.

This article covers:

  1. Deploy the APISIX Ingress controller to the remote Kubernetes cluster within IDE
  2. Developing and debugging APISIX ingress controller in Kubernetes without image rebuilding

Prerequisites#

  • Prepare an available Kubernetes cluster in your workstation. You can use any Kubernetes clusters that you have namespace admin privilege.
  • Helm v3.0+ installed
  • APISIX installed
  • GoLand IDE 2020.03+ (I am using GoLand 2021.2 in this article)
  • Install Nocalhost JetBrains plugin
  • Install Go 1.13 or later

Deploy APISIX Ingress Controller#

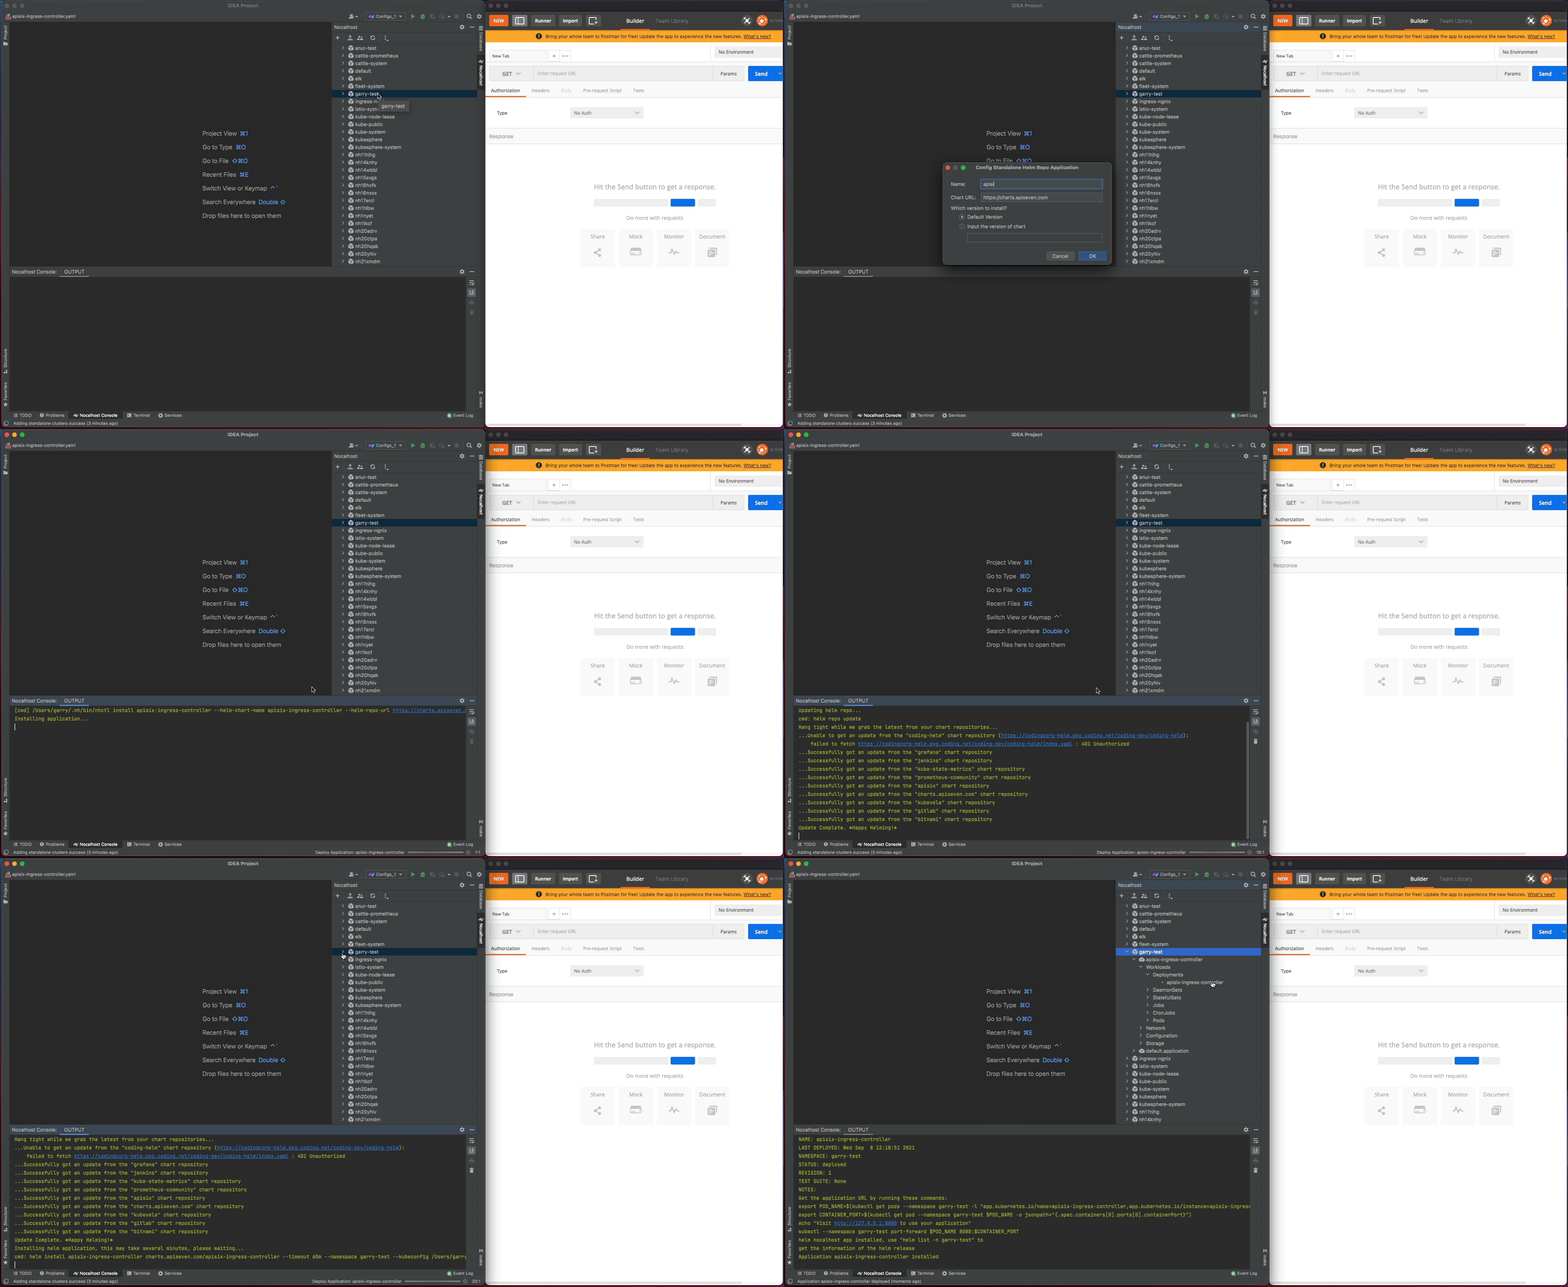
I'm going to deploy APISIX Ingress Controller by Nocalhost within GoLand:

  1. Open the Nocalhost plugin within GoLand
  2. Use the cluster inspector to select the namespace that you want to deploy.
  3. Right-click the selected namespace, choose Deploy Application, and select Helm Repo as installation method.
  4. In the following dialog box, input
    • apisix-ingress-controller as Name
    • https://charts.apiseven.com as Chart URL
Deploy APISIX ingress controller

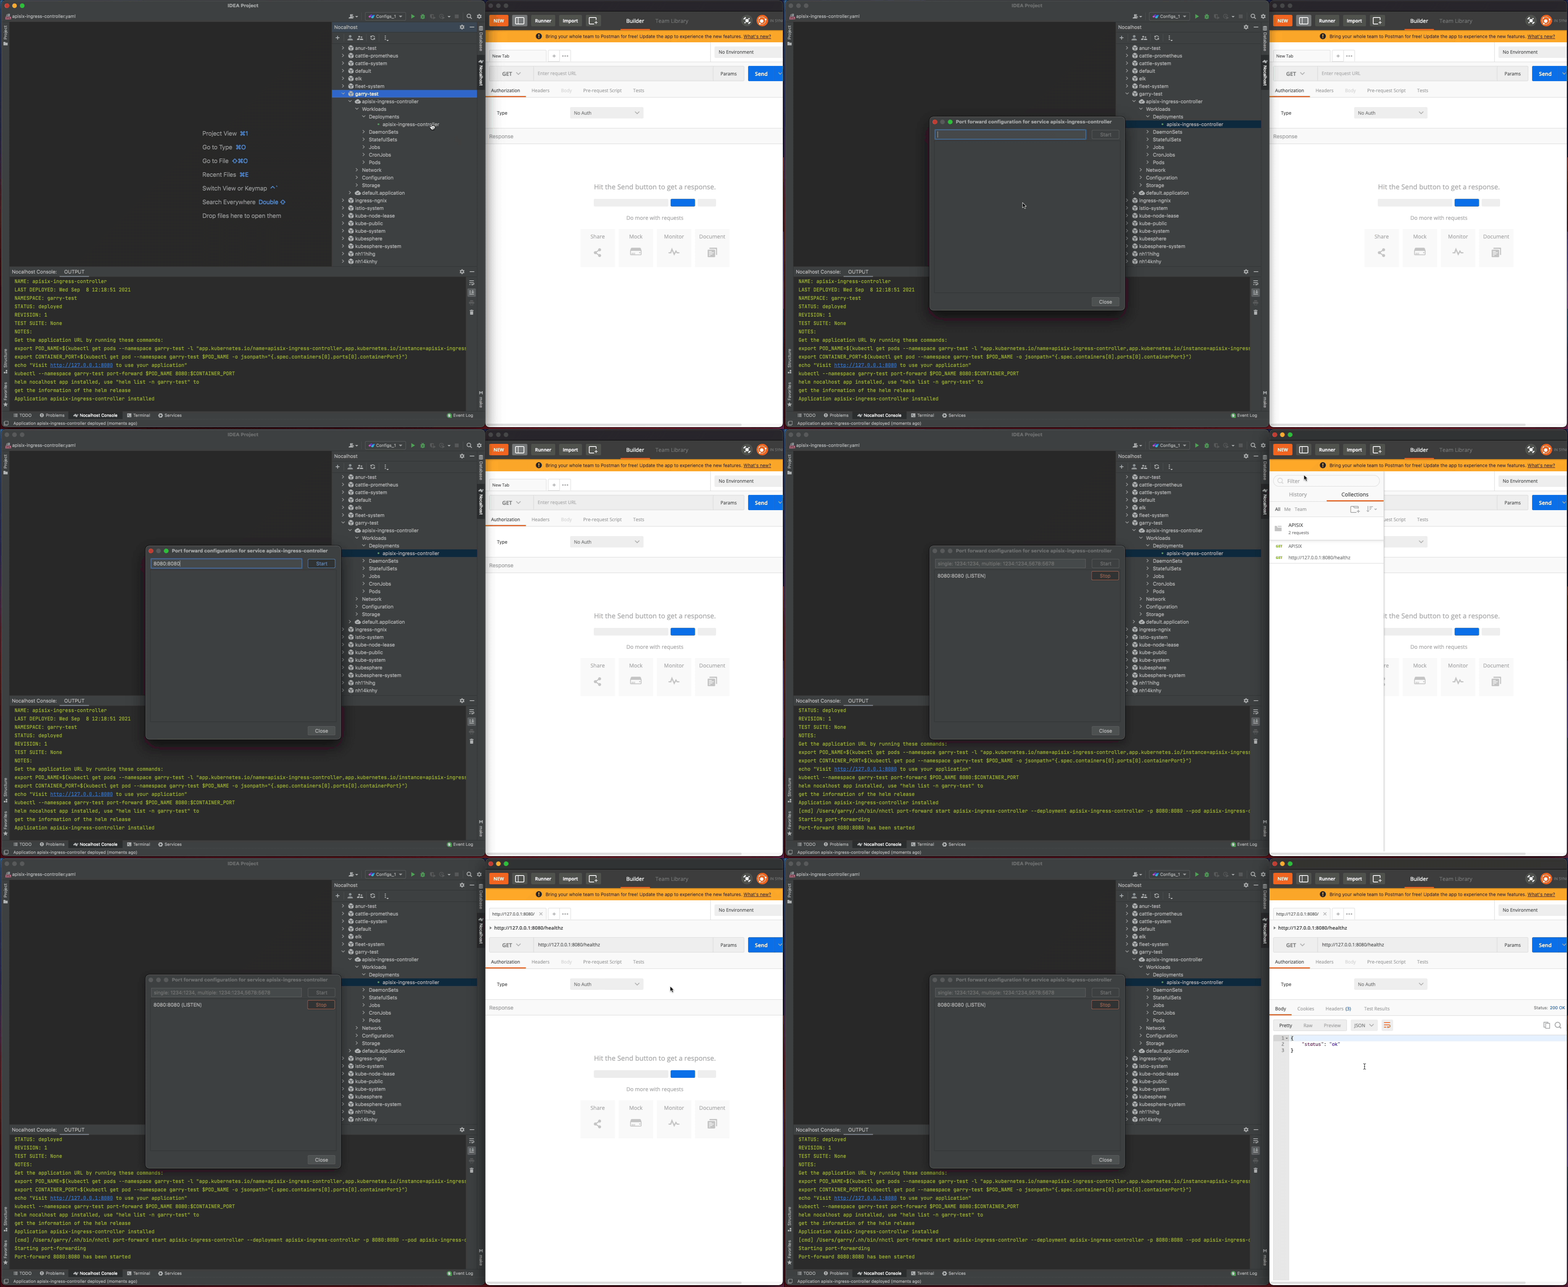
Let's test the apisix-ingress-controller after deployment by enable the port-forwarding within IDE:

  1. Find the apisix-ingress-controller workload in the cluster inspector, right-click and select the Port Forward
  2. Add the port-forwarding 8080:8080
  3. Visiting the http://127.0.0.1:8080/healthz in local and check the result
Test the deployment

Developing#

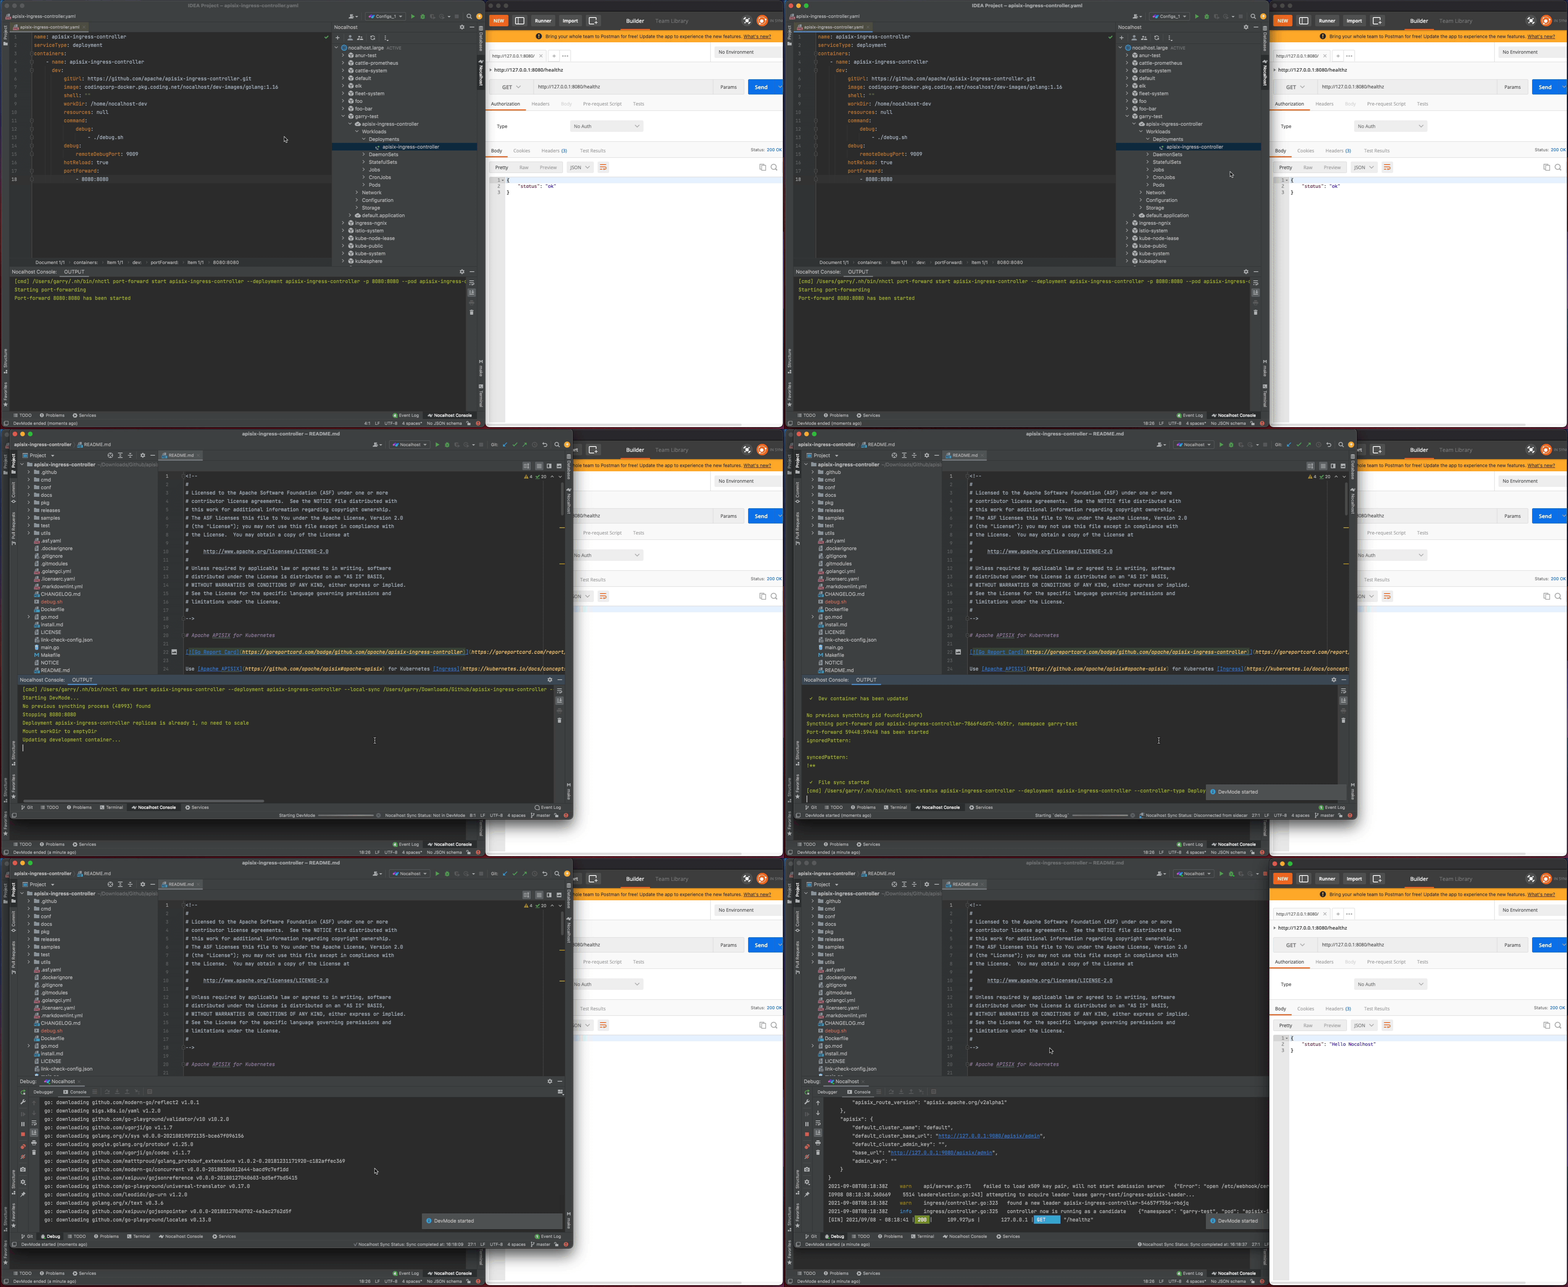
Step 1. Start DevMode#

  1. Right-click the deployment apisix-ingress-controller in cluster inspector, select Start DevMode
  2. Choose your source code directory if you have already cloned in local, or let Nocalhost clone the source code for you by entering the apache/apisix-ingress-controller repository URL
  3. Wait for the operations, Nocalhost will open the remote terminal within IDE after entering DevMode

Now start the apisix-ingress-controller process by entering the following command in the remote terminal:

go run main.go ingress --config-path conf/config-default.yaml

After the apisix-ingress-controller has started, access the service by visiting http://127.0.0.1:8080/healthz on local and check the result.
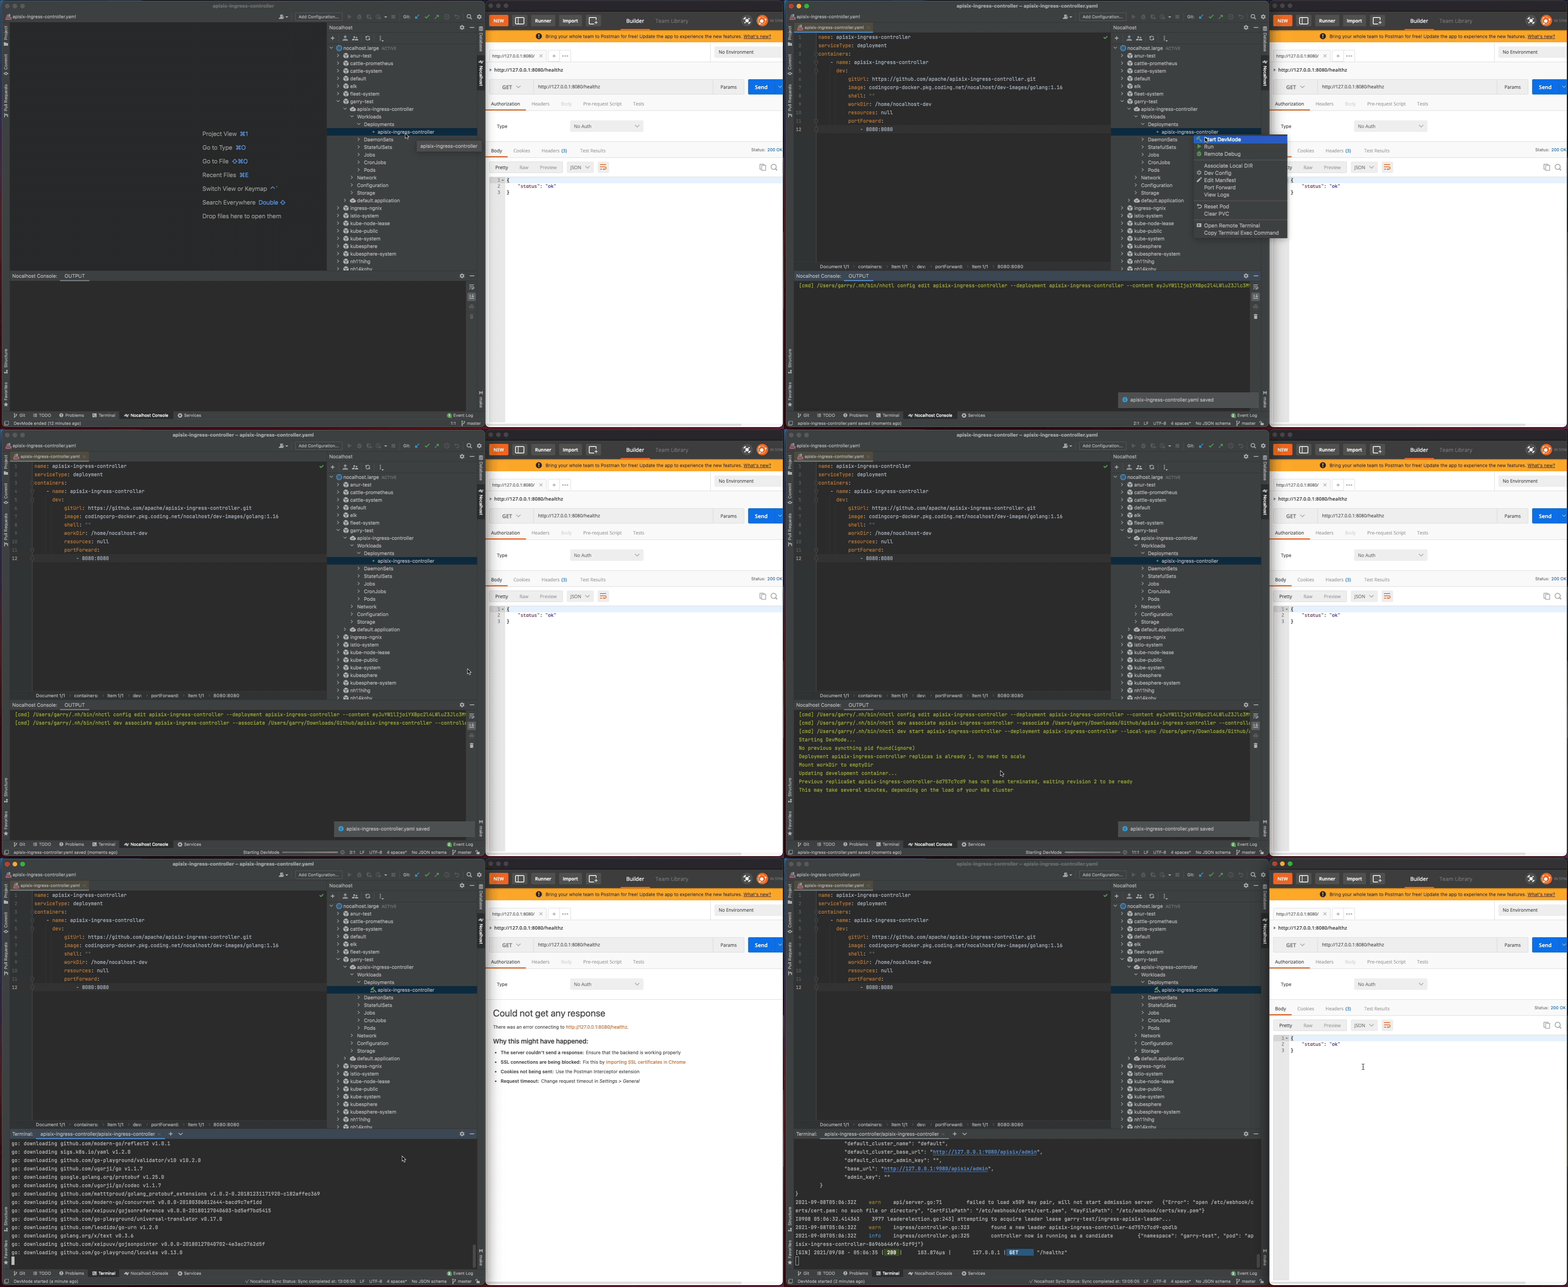
Entering DevMode

Step 2. Change code and check result#

Now I will make some code changes and check the result.

  1. Stop the apisix-ingress-controller process
  2. Search healthz and find the router.go file. Change the healthzResponse status code from ok to Hello Nocalhost
  3. Start the process again and check the change result in local
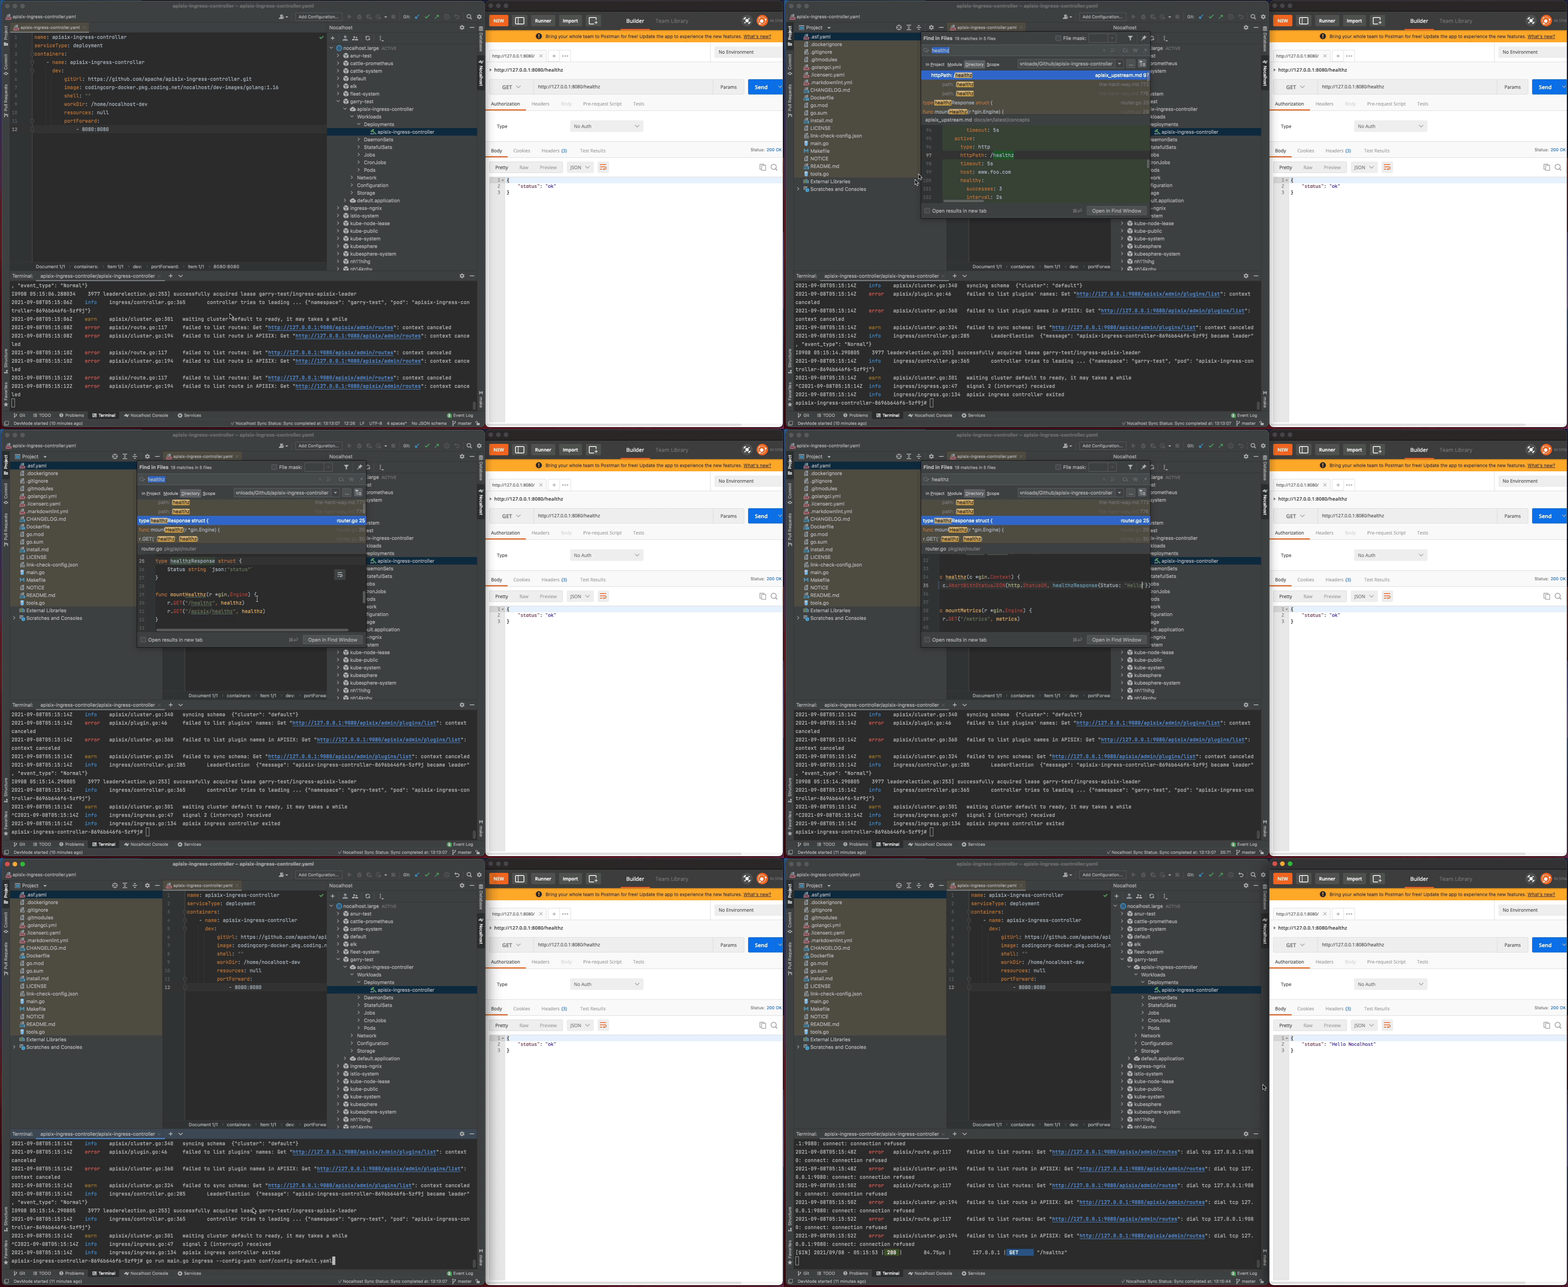
⭐️   No need to rebuild image or restart container, see result under seconds   ⭐️

Step 3. End DevMode#

Now close the development window and end DevMode.

  1. Right-click the apisix-ingress-controller in the cluster inspector
  2. Select End DevMode

Nocalhost will make apisix-ingress-controller end DevMode, and reset the apisix-ingress-controller Pod to its original version. Enable the port-forwarding and check the result after ending DevMode.
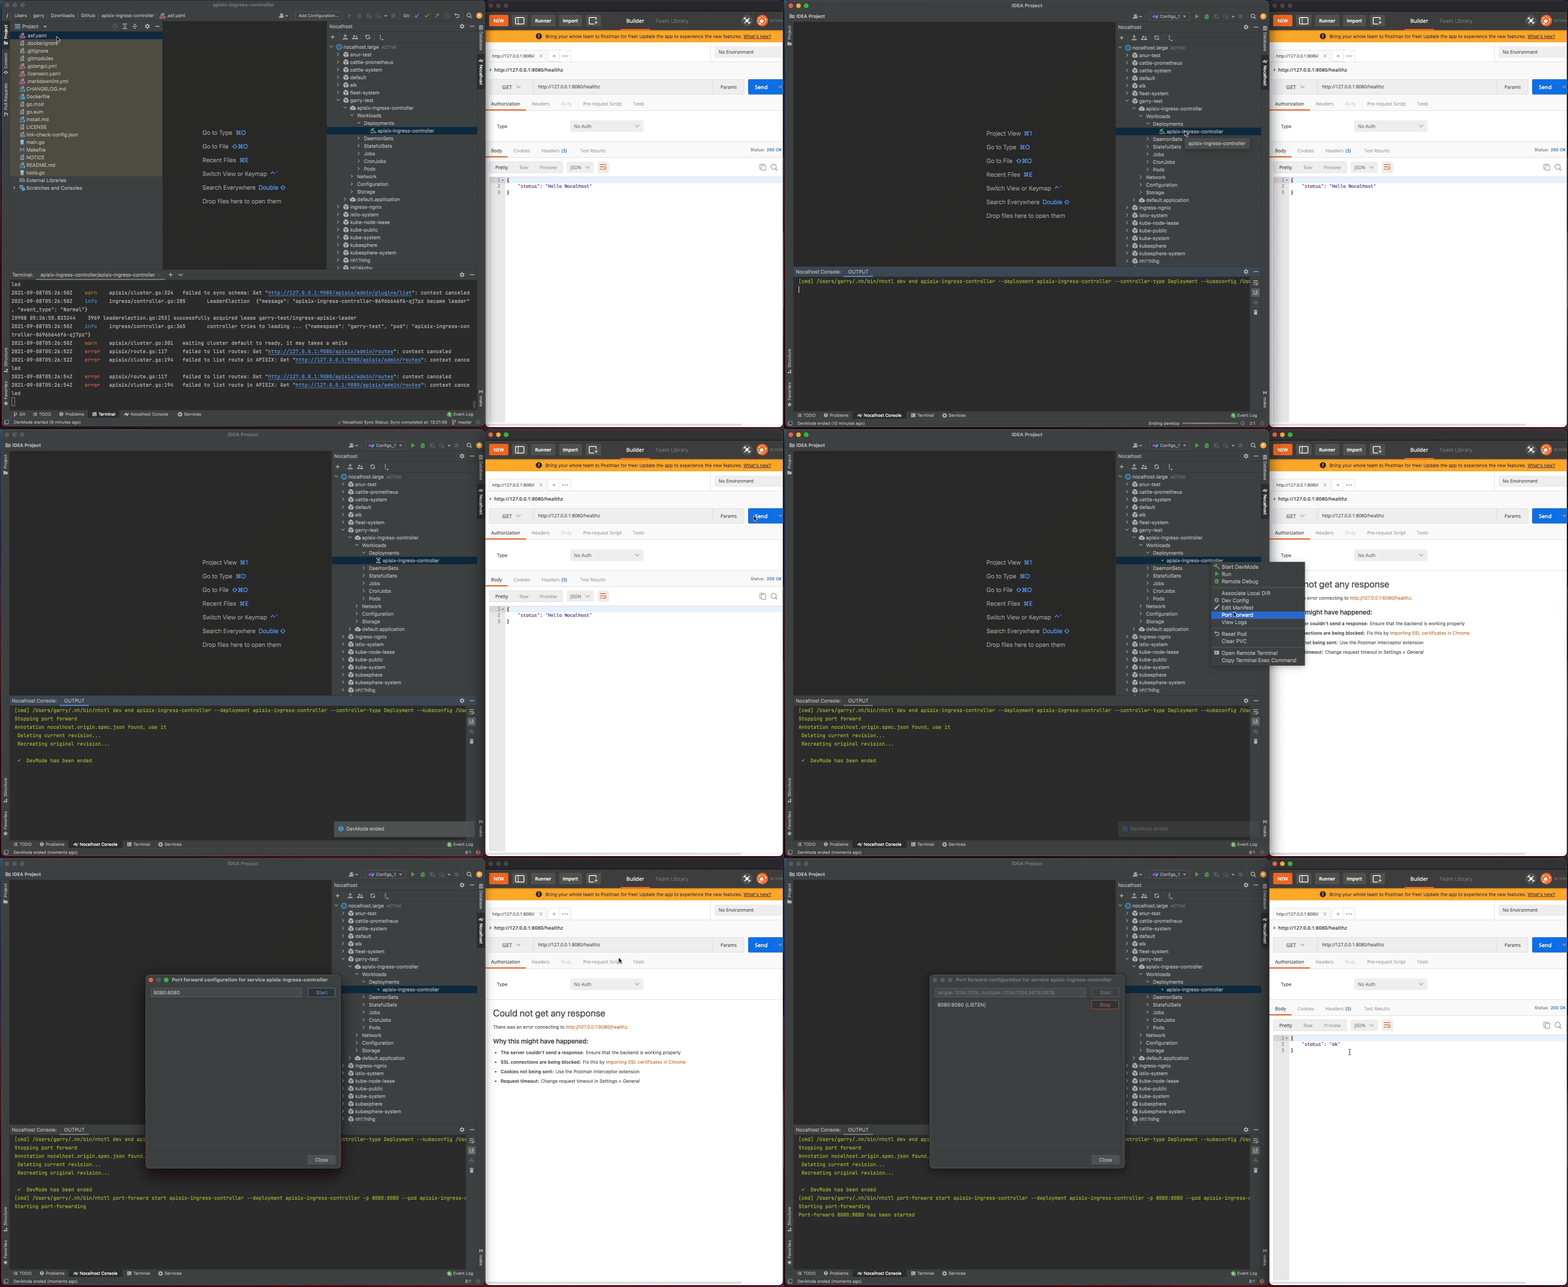
Ending DevMode
Code Change

All code changes in DevMode will only take effect in the development container.

After exiting the DevMode, Nocalhost will reset the remote container to its original state (before the code is modified). In this way, after exiting the DevMode, the modification of the code will not cause any changes or impact on the original environment.

Debugging#

Debugging an application is not easy, and debugging an application in the Kubernetes cluster is even more difficult. Nocalhost is here to help by providing the same debugging experience you're used in the IDE when debugging in the remote Kubernetes cluster.

Step 1. Start remote debugging#

We can start remote debugging by:

  1. Right-click apisix-ingress-controller and choose Remote Debug
  2. Nocalhost will put apisix-ingress-controller into DevMode and run debug command defined in dev config automatically
Start remote debugging

Step 2. Step through breakpoints#

Now set a breakpoint on the healthz function. Hover over just to the left of the line number and click on the red dot. Once it’s set, visit http://127.0.0.1:8080/healthz in your local browser, GoLand should pop to the foreground. Click the play button to close the request and the progress should continue loading.

In addition, as I enable the dev.hotReload, so every time you make the code change, Nocalhost will automatically re-run the debug command. This is very useful when you make the code change and debug frequently.
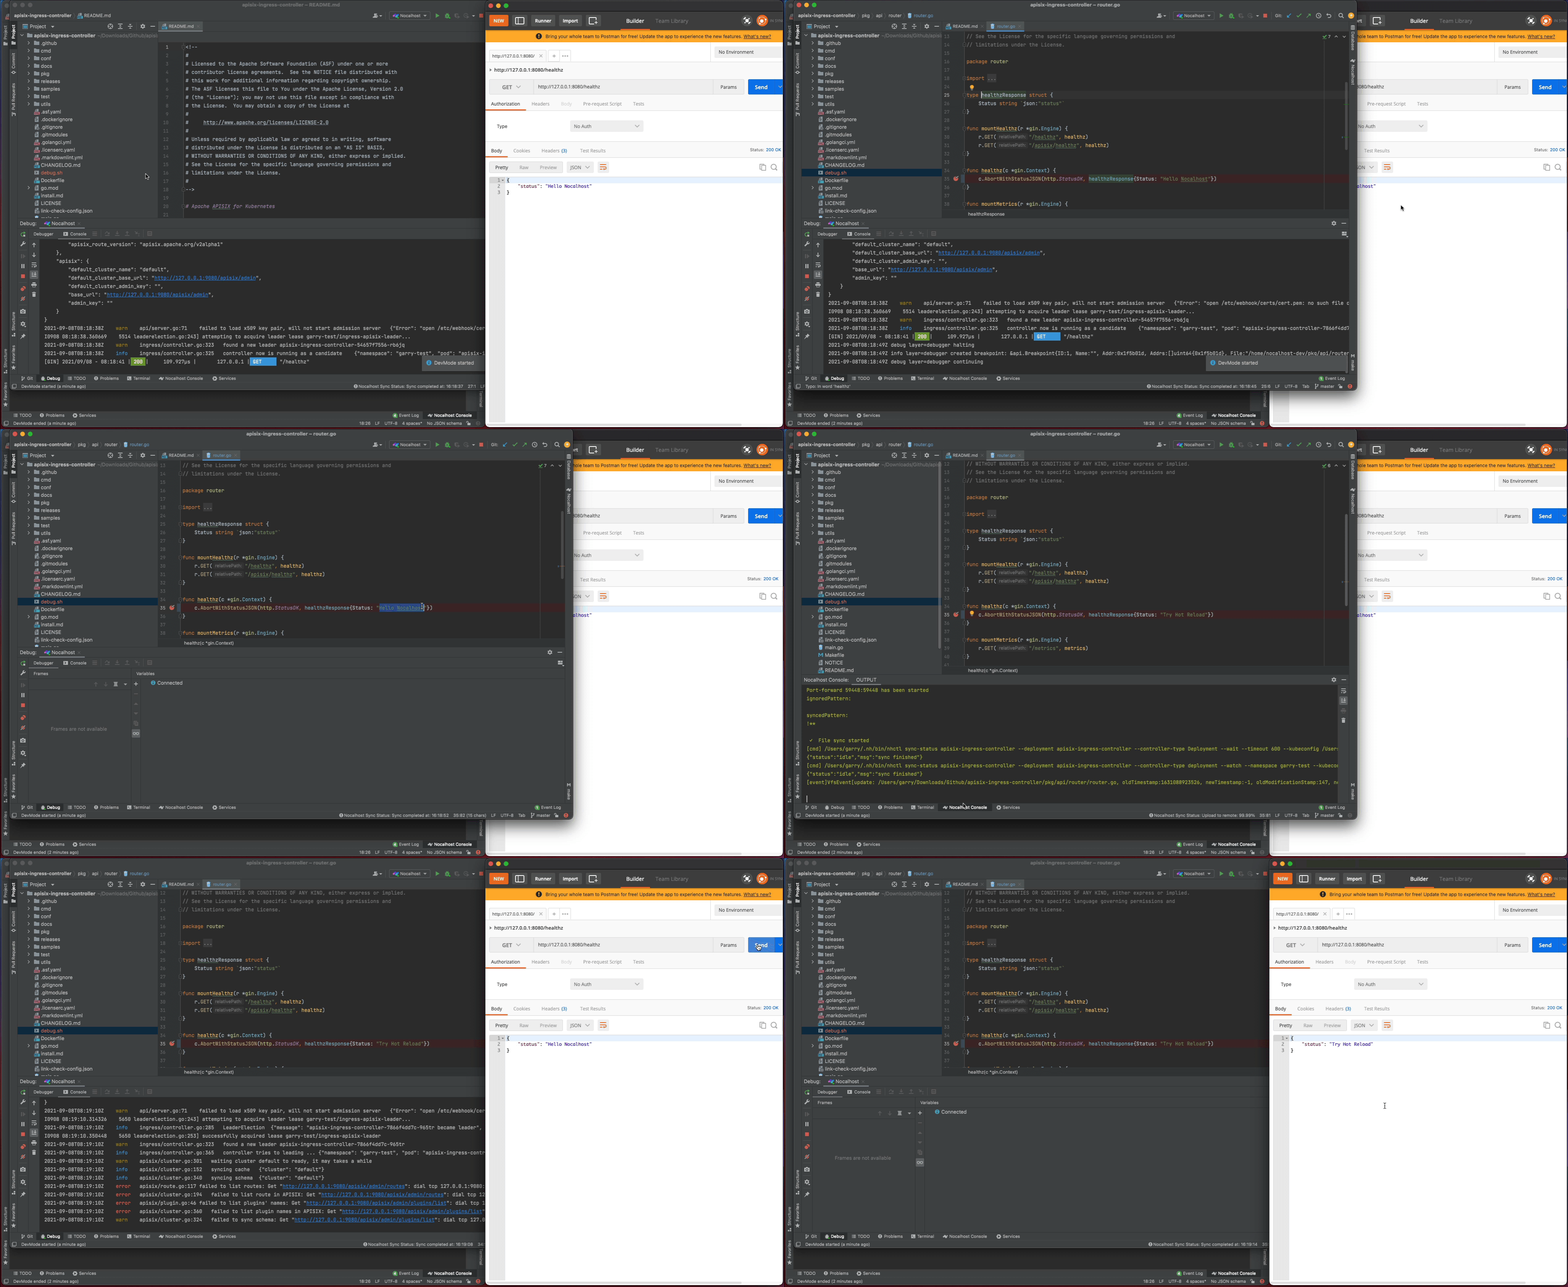
Setting up breakpoints and run the service

Remote Run#

Not just remote debugging, Nocalhost also provides an easy way to run your Go service in the Kubernetes cluster, plus hot reload!

You can using the remote run feature by:

  1. Right-click apisix-ingress-controller in cluster inspector, choose Remote Run
  2. Nocalhost will put apisix-ingress-controller into DevMode and start run command defined in dev config automatically

Now every time you make code changes, Nocalhost will automatically trigger the run command. You can now enjoy the hot reload for Go without complex configuration.
Remote run

Conclusion#

Today, we’ve learned how to use Nocalhost to develop and debug the APISIX ingress controller in Kubernetes. Now, instead of waiting for slow local development processes, we can iterate quickly with an instant feedback loop and a productive cloud-native development environment.
References#

How to debug microservices in Kubernetes with proxy, sidecar or service mesh?

Jimmy Song

Jimmy Song

Developer advocate at Tetrate

This blog is originally posted on Jimmy's Blog

How to debug microservices in Kubernetes with proxy, sidecar or service mesh?#

This article explains three patterns/tools for debugging microservices in Kubernetes and the changes brought by the introduction of Istio for debugging microservices.

Kubernetes is arguably the best environment for running microservices so far, but the experience of debugging microservices in a Kubernetes environment may not be as user-friendly. This article will show you how to debug microservices in Kubernetes, introduce common tools, and explain how the introduction of Istio impacts debugging microservices.

Debugging microservices is vastly different from traditional monolithic applications#

The debugging of microservices has been a long-standing problem for software developers. This challenge does not exist in traditional monolithic applications because developers can leverage the debugger in IDEs to add breakpoints, modify environment variables, single-step execution, etc. for their applications, all of which provide great help in software debugging. With the popularity of Kubernetes, the debugging of microservices becomes a thorny issue, where the following issues are more complicated than the debugging of traditional monolithic applications.

Multiple dependencies#

A microservice often depends on multiple other microservices, some shared volumes across multiple microservices, and authorizations based on service accounts. When debugging a microservice, how do you deploy other dependent services to quickly build a latest set of staging environments?

Access from a local machine#

When microservices are running on a developer’s local computer, there is usually no direct access to the services in a Kubernetes cluster. How can you debug microservices deployed in a Kubernetes cluster as if they were local services?

Slow development loop#

Usually, it takes a long process to update the code and build it into an image before pushing it to the cluster. How do you speed up the development cycle? Let’s look at the tools that address those challenges.

Tools#

The main solutions for debugging microservices in Kubernetes are:

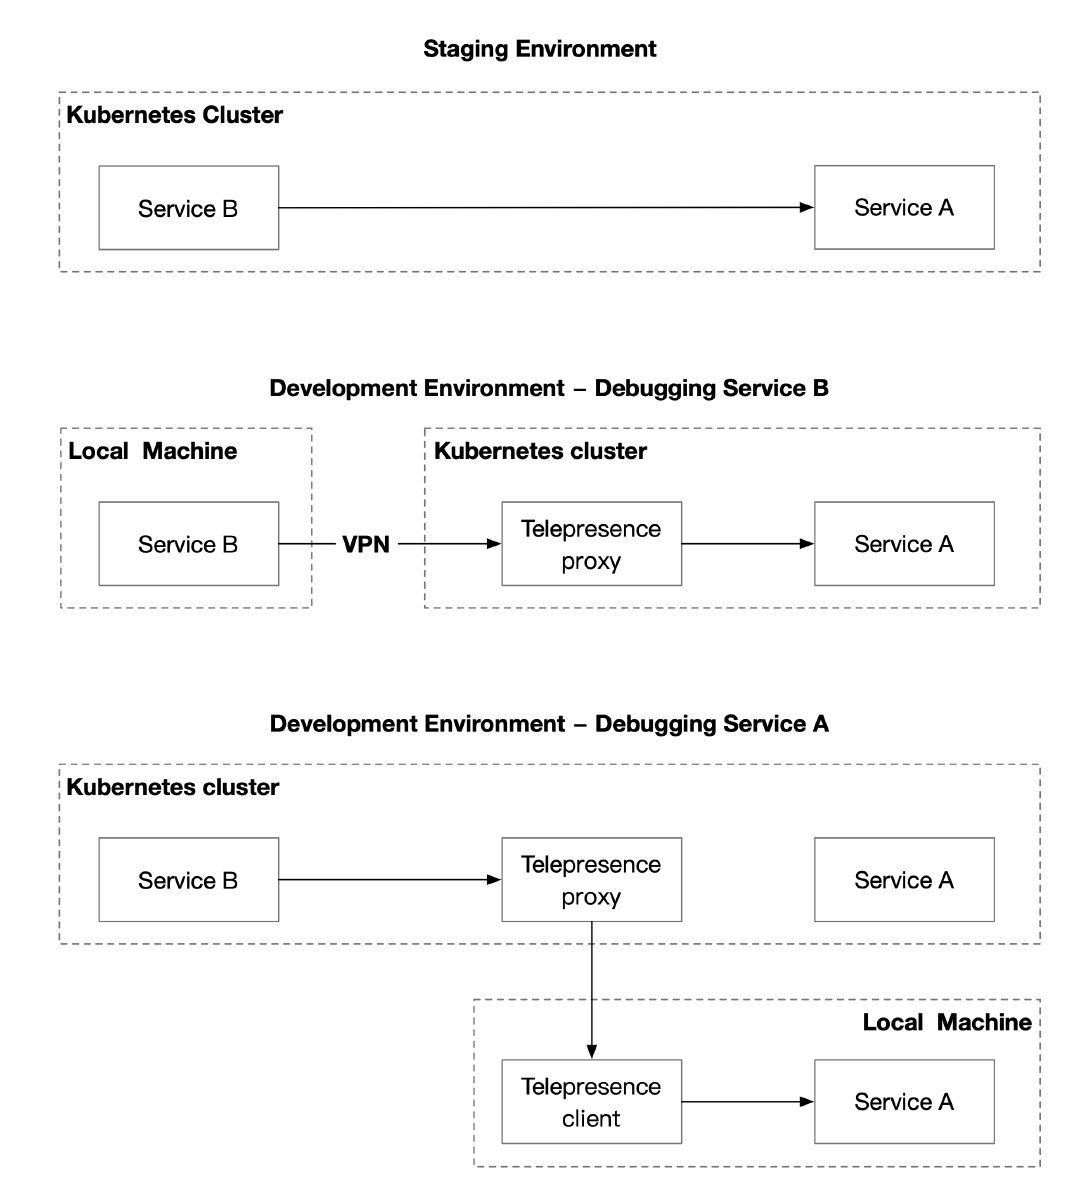
  • Proxy: by building a VPN, deploying a proxy in the Kubernetes cluster, and adding local debug endpoints to make the services in Kubernetes directly accessible to local applications, your architecture will look like [ local service ] <-> [ proxy ] <-> [ app in Kubernetes ].
  • Sidecar: Inject a sidecar into the pod of the microservice to be debugged to intercept all traffic to and from the service, so that the service can be tracked and monitored, and the service can also be debugged in this sidecar.
  • Service Mesh: To get an overall picture of the application, inject sidecars into all microservices so that you can get a dashboard that monitors global status.

Here are three typical open source projects that implement the above solutions, each of which can help you debug microservices from a different perspective. You can apply them at different stages of software development and they can be said to be complementary to each other.

Proxy – debugging microservices with Telepresence#

Telepresence is essentially a local proxy that proxies data volumes, environment variables, and networks in a Kubernetes cluster locally. The following diagram shows the main usage scenarios for Telepresence.

Proxy mode: Telepresence

Users need to manually execute the telepresence command locally, which will automatically deploy the agent to Kubernetes. Once the agent has been deployed,

  • Local services will have complete access to other services in the Kubernetes cluster, environment variables, Secret, ConfigMap, etc.
  • Services in the cluster also have direct access to the locally exposed endpoints.

However, this approach requires users to run multiple commands while debugging locally, and in some network environments it may not be possible to establish a VPN connection to the Kubernetes cluster.

Sidecar – debugging microservices with Nocalhost#

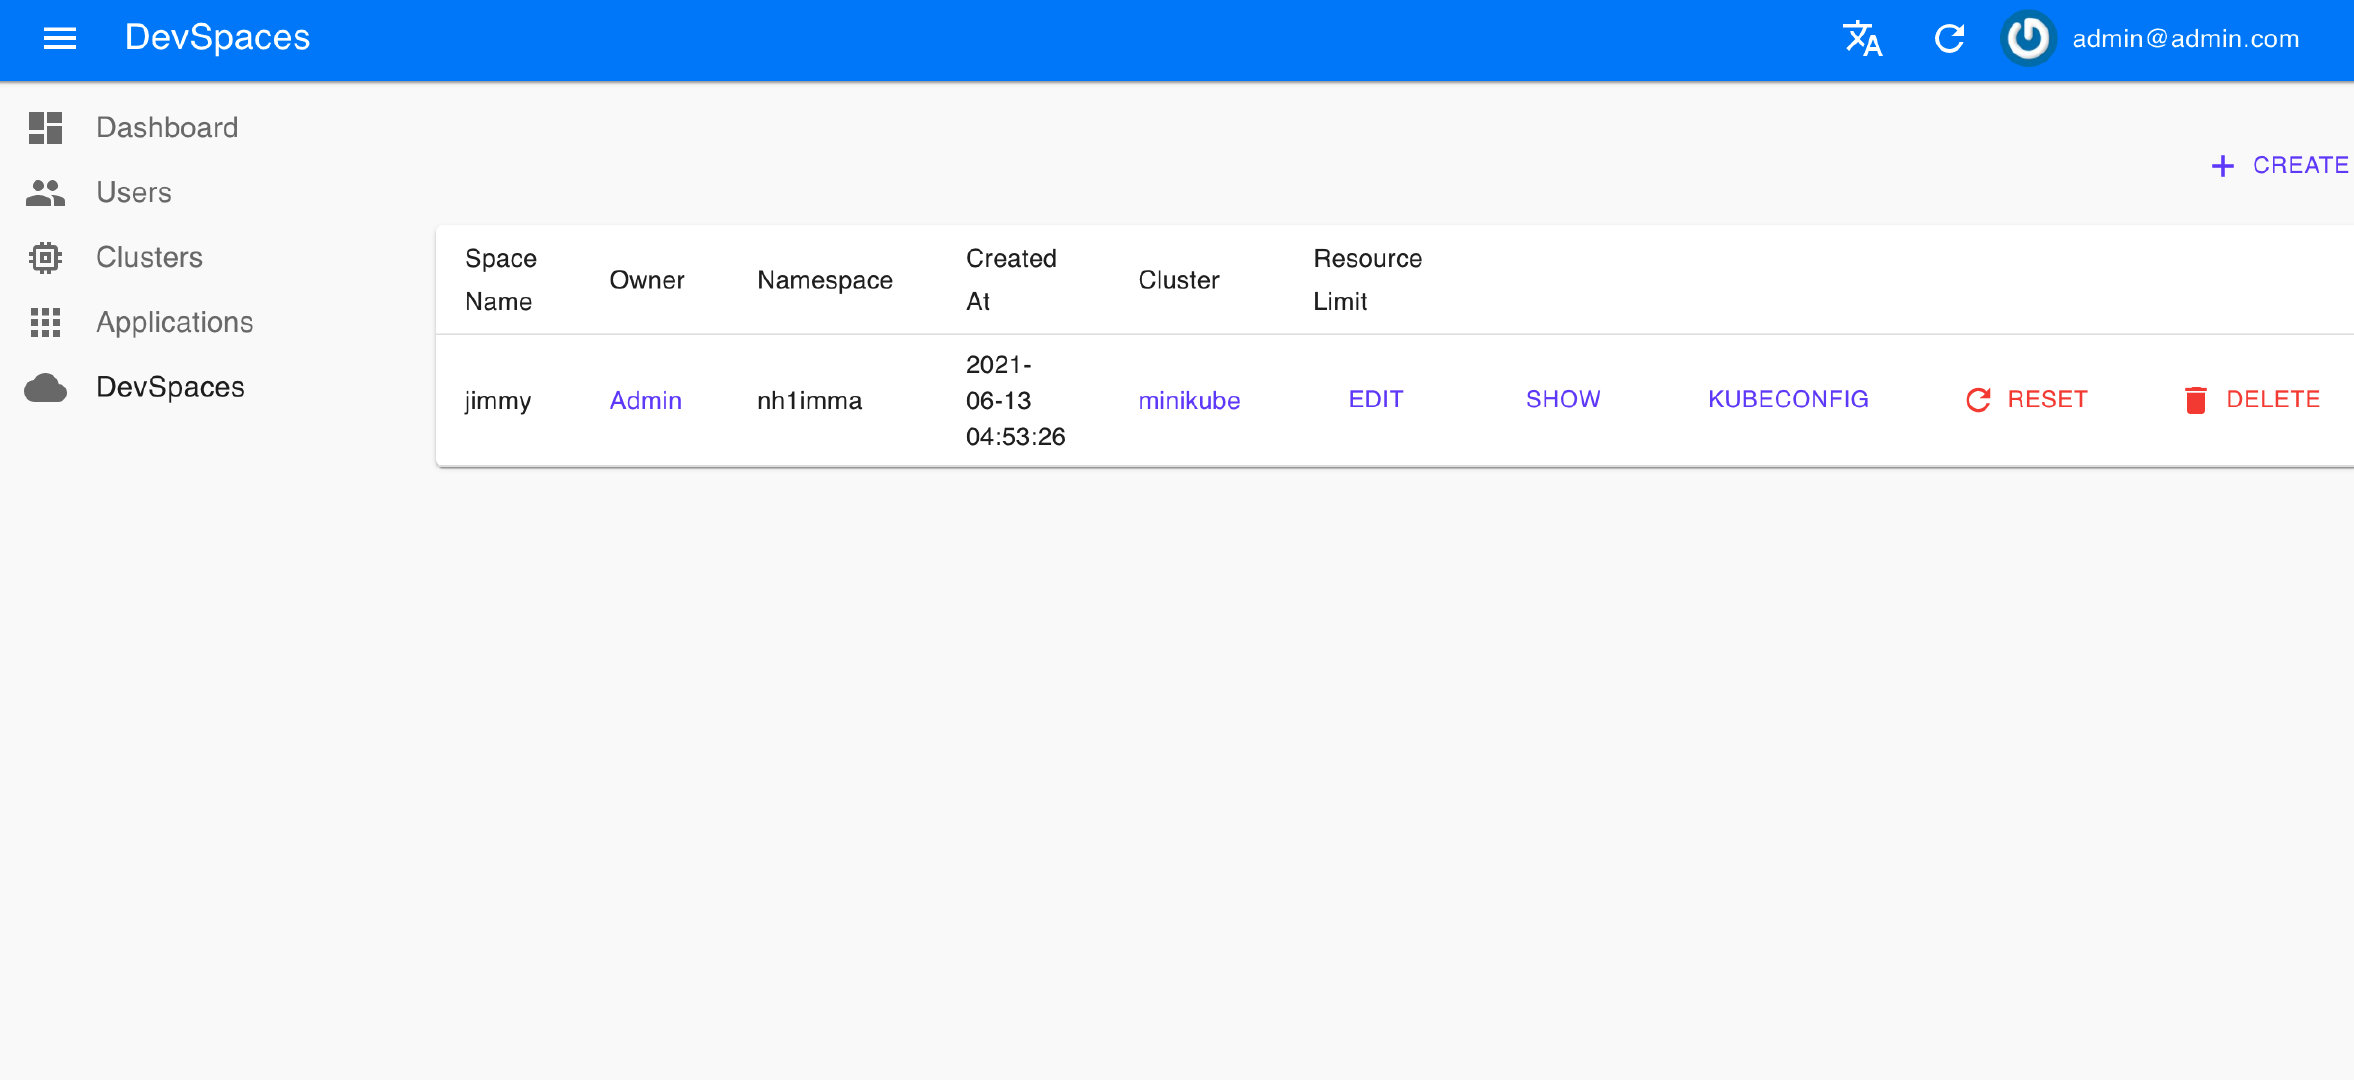
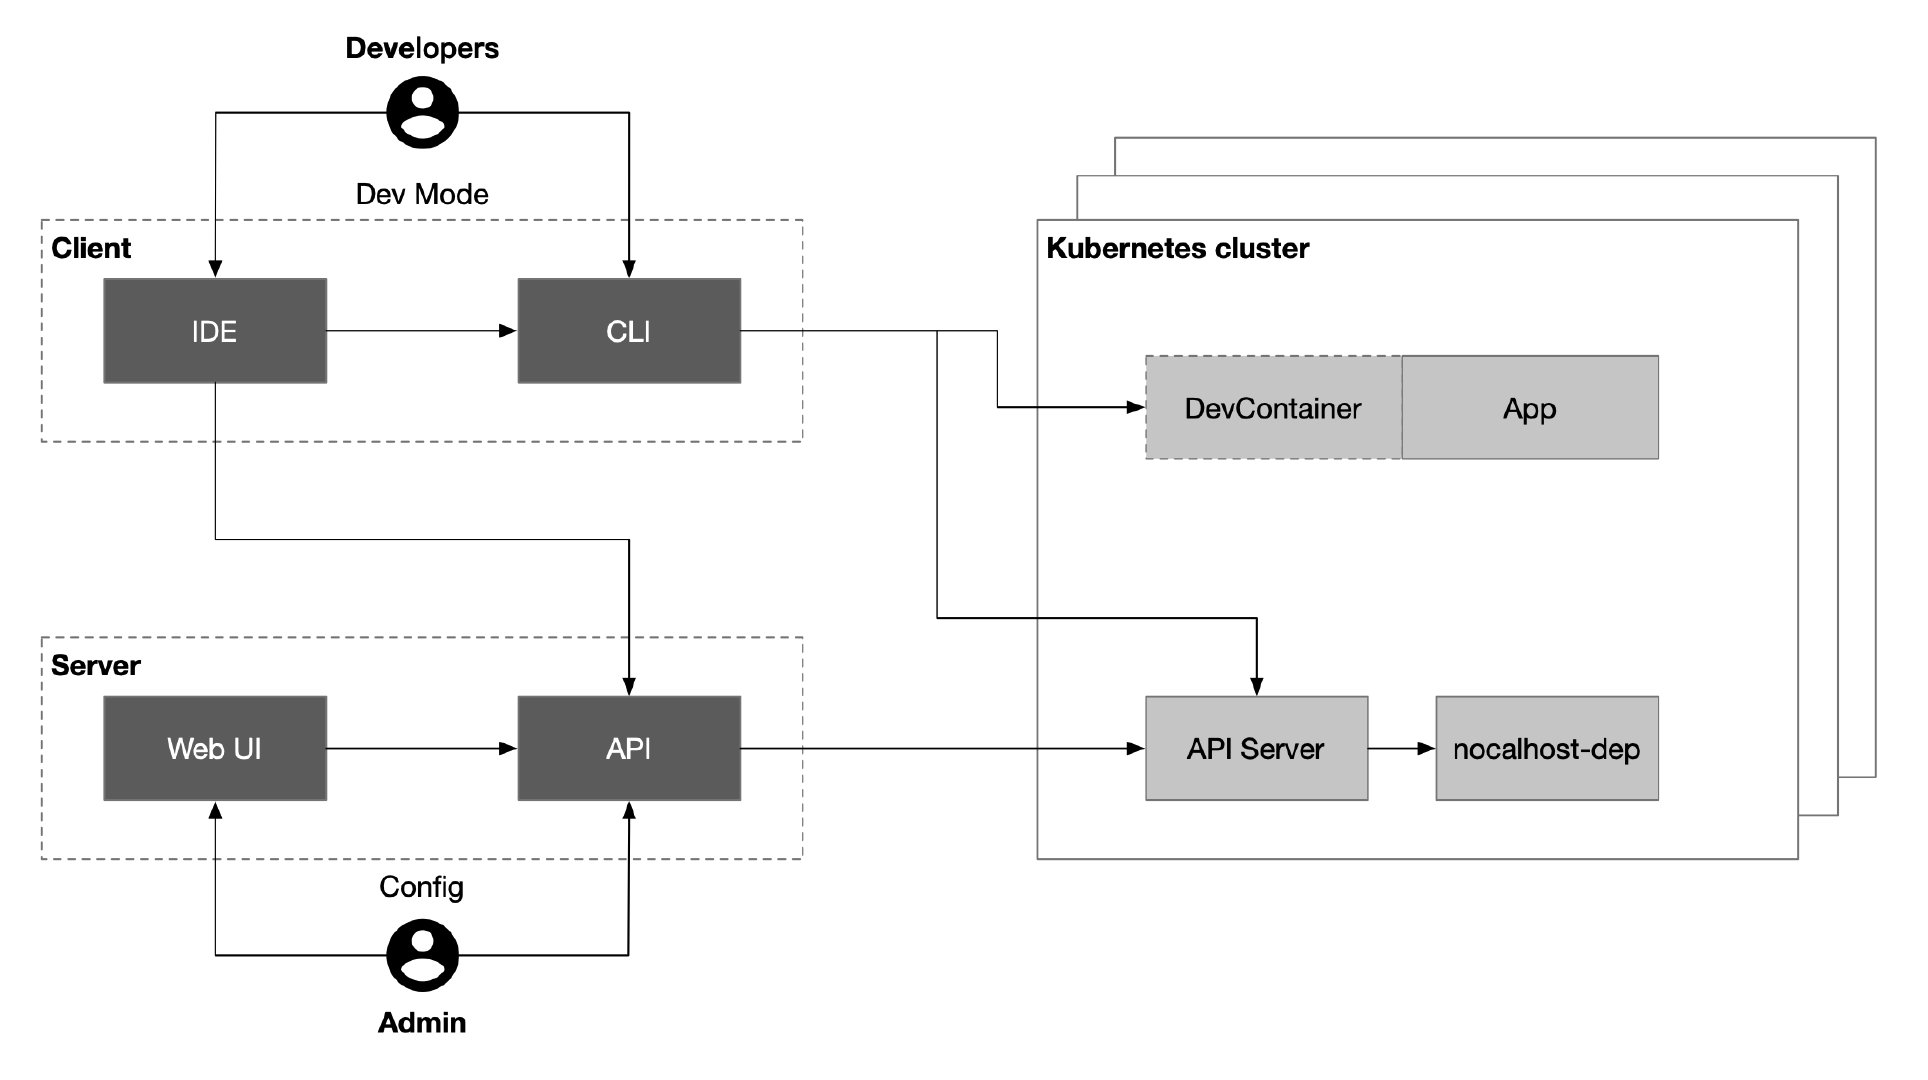
Nocalhost is a Kubernetes-based cloud development environment. To use it, you just need to install a plugin in your IDE – VS Code to extend Kubernetes and shorten the development feedback cycle. The development environment can be isolated by creating different namespaces for different users and using ServiceAccount when binding to different user corners. Nocalhost also provides a web console and API for administrators to manage different development environments.

Sidecar mode: Nocalhost

As long as you have a Kubernetes cluster and have admin rights to the cluster, you can refer to the Nocalhost documentation to quickly start trying it out. To use the Nocalhost plugin in VS Code, you need to configure the Kubernetes cluster in the plugin first.

  1. Select the Kubeconfig file you just exported or copy and paste the contents of the file directly into the configuration.
  2. Then select the service you need to test and select the corresponding Dev Container. VS Code will automatically open a new code window.

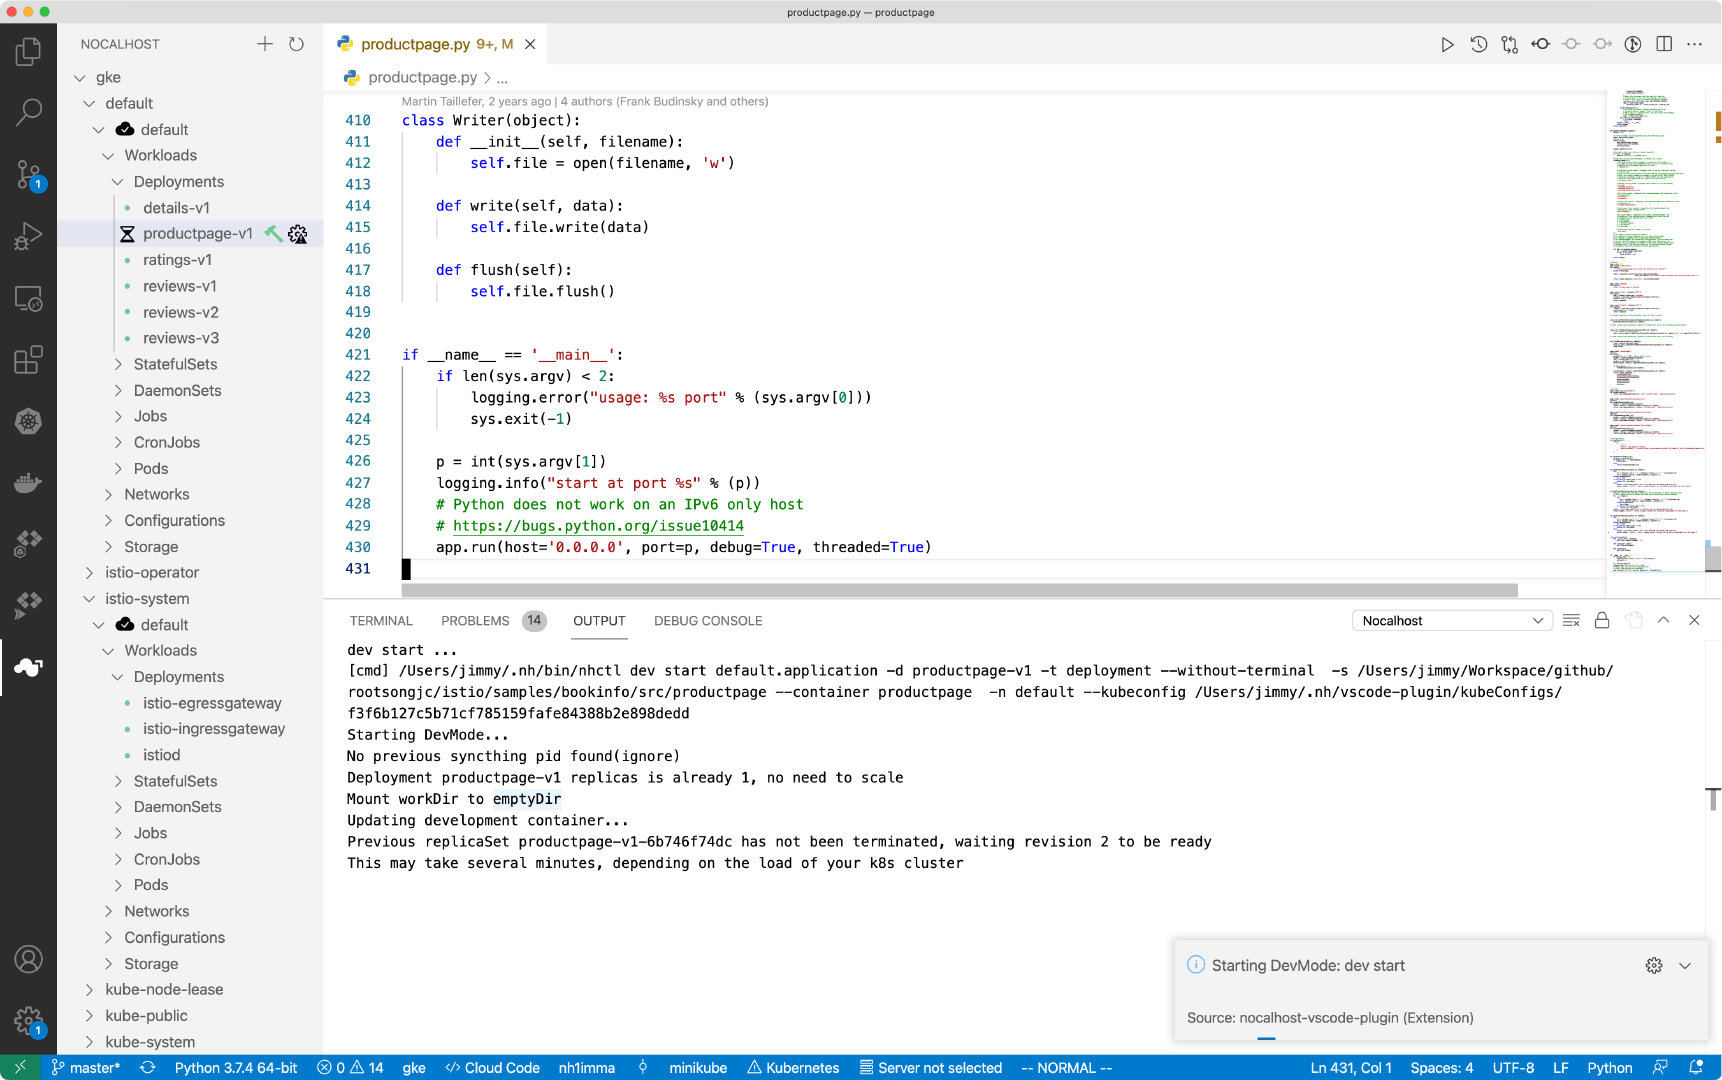
Here is an example of the bookinfo sample provided by Istio. You can open the cloned code in your local IDE and click the hammer next to the code file to enter development mode. Selecting the corresponding DevContainer and Nocalhost will automatically inject a development container sidecar into the pod and automatically enter the container in the terminal, as shown in the following figure.

Nocalhost VS Code

In development mode, the code is modified locally without rebuilding the image, and the remote development environment takes effect in real time, which can greatly accelerate the development speed. At the same time, Nocalhost also provides a server for managing the development environment and user rights, as shown in the following figure.

Nocalhost Server

Service Mesh – debugging microservices with Istio#

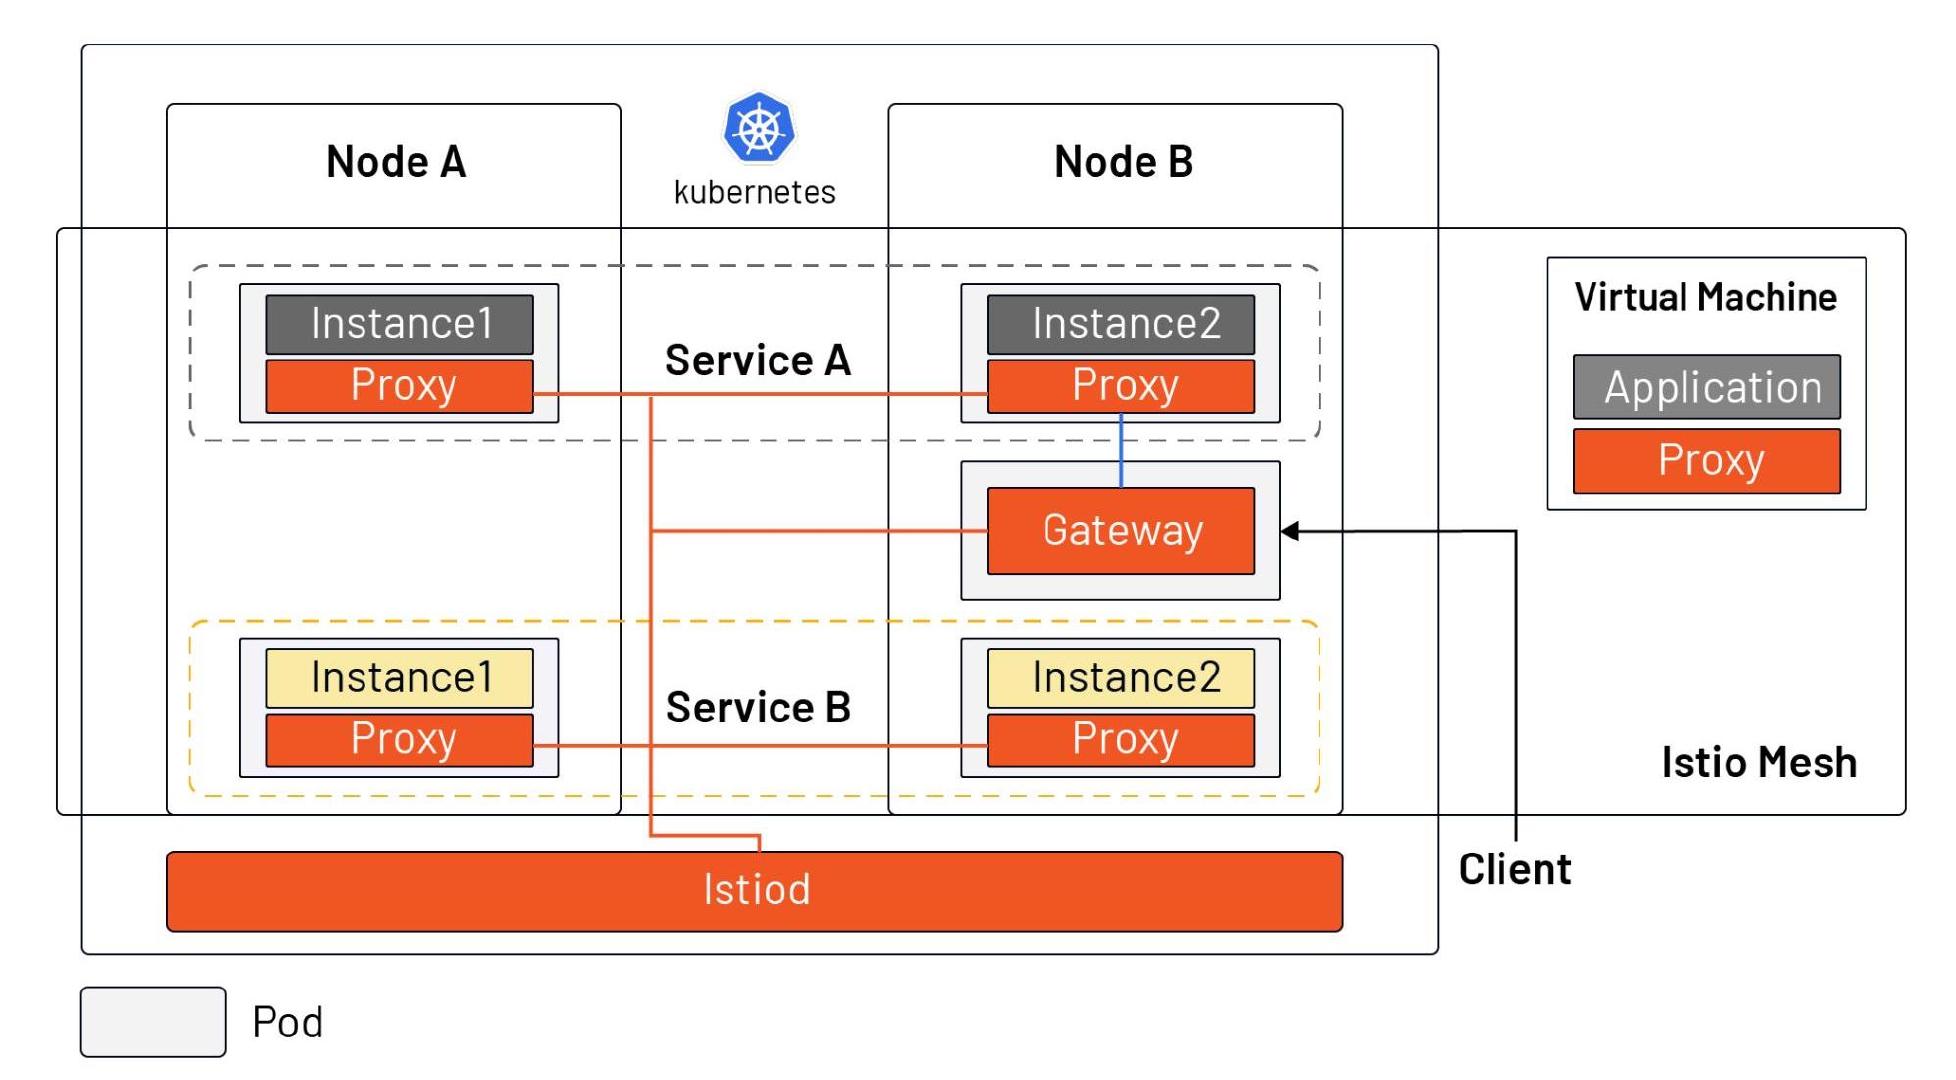
The above method of using proxy and sidecar can only debug one service at a time. You’ll need a mesh to get the global status of the application, such as the metrics of the service obtained, and debug the performance of the service by understanding the dependency and invocation process of the service through distributed tracing. These observability features need to be implemented by injecting sidecar uniformly for all services. And, when your services are in the process of migrating from VMs to Kubernetes, using Istio can bring VMs and Kubernetes into a single network plane (as shown below), making it easy for developers to debug and do incremental migrations.

Service Mesh mode: Istio

Of course, these benefits do not come without a “cost.” With the introduction of Istio, your Kubernetes services will need to adhere to the Istio naming convention and you’ll need to know how to debug microservices using the Istioctl command line and logging.

  • Use the istioctl analyze command to debug the deployment of microservices in your cluster, and you can use YAML files to examine the deployment of resources in a namespace or across your cluster.
  • Use istioctl proxy-config secret to ensure that the secret of a pod in a service mesh is loaded correctly and is valid.

Summary#

In the process of microservicing applications and migrating from virtual machines to Kubernetes, developers need to make a lot of changes in their mindset and habits. By building a VPN between local and Kubernetes via proxy, developers can easily debug services in Kubernetes as if they were local services. By injecting a sidecar into the pod, you can achieve real-time debugging and speed up the development process. Finally, the Istio service mesh truly enables global observability, and you can also use tools like Tetrate Service Bridge to manage heterogeneous platforms, helping you gradually move from monolithic applications to microservices.

Redefine Cloud Native Dev Environment

Wang Wei

Wang Wei

Nocalhost Core Team

Preface#

With the rapid development of business, the organizational structure of the technical department has been continuously expanded and adjusted horizontally and vertically. At the same time, the enterprise's production materials: application systems, have also become larger and larger. In order to adapt the application system to the adjustment of the enterprise organizational structure and sort out the boundaries of the organizational structure for application rights and responsibilities, most organizations will choose to use the "microservice" architecture to split the application system horizontally, so that the maintenance boundary of the application system is adapted The power and responsibility boundary of the organizational structure.

Generally speaking, the larger the organizational structure, the more detailed the application system will be, and the number of "microservices" will also increase. In the practice of splitting "microservices", it is easy to mark the authority and responsibility boundaries of the organizational structure into the splitting granularity of "microservices", which may lead to too fine granularity of "microservices". The problem of further sharp increase in number. In the end, the calling relationship between "microservices" is like cross-departmental collaboration, and it has become more and more complex. The problem is particularly prominent when you want to add new requirements.

While "microservices" bring convenience, it also brings additional challenges for developers: how to quickly start a complete development environment? The development requirements depend on how other colleagues can coordinate and debug? How to quickly debug these microservices?

For managers, it also brings a series of challenges: how to manage the development environment of developers? How to let new colleagues quickly develop?

Imagine what difficulties would you encounter when developing a cloud-native application consisting of 200 "microservices"?

Localhost era#

In the era of monolithic applications, it is extremely friendly to developers. Developers use the local machine to run the application, modify the code to take effect in real time, and visit Localhost through a browser to view the code effect in real time.

Monolithic applications are different from "microservices" applications. Monolithic applications are organized as "ALL-IN-ONE". All calling relationships are limited to their own classes and functions, and the hardware requirements of applications are generally not too high.

The development of "microservice" applications is quite different. Due to the mutual dependence, when a certain function or microservice needs to be developed, all dependent services have to be activated. With the increase in the number of microservices, more and more local resources are needed to develop applications, which ultimately leads to the local inability to meet the configuration requirements of development.

Cloud Native liberates deployment and operation, What about development?#

The popularity of cloud native and Kubernetes further shields the complexity of "microservice" applications, which is mainly reflected in the deployment and operation and maintenance stages.

In order to solve the problem of environmental consistency in the development, testing, and production stages of microservice applications, modern microservice application development will package each component into a Docker image and deploy it in the form of workload. Using continuous integration and continuous deployment in the DevOps pipeline, combined with Kubernetes probes, HPA, and application self-healing capabilities, completely liberated the deployment and operation and maintenance of microservice applications.

But we overlooked a key node: the development phase.

After microservice applications are packaged with Kubernetes workloads, the problem of rapid application startup in the development process is solved. Developers only need to install a single-node Kubernetes cluster locally, such as Minikube, Kind, etc., to quickly start microservice applications.

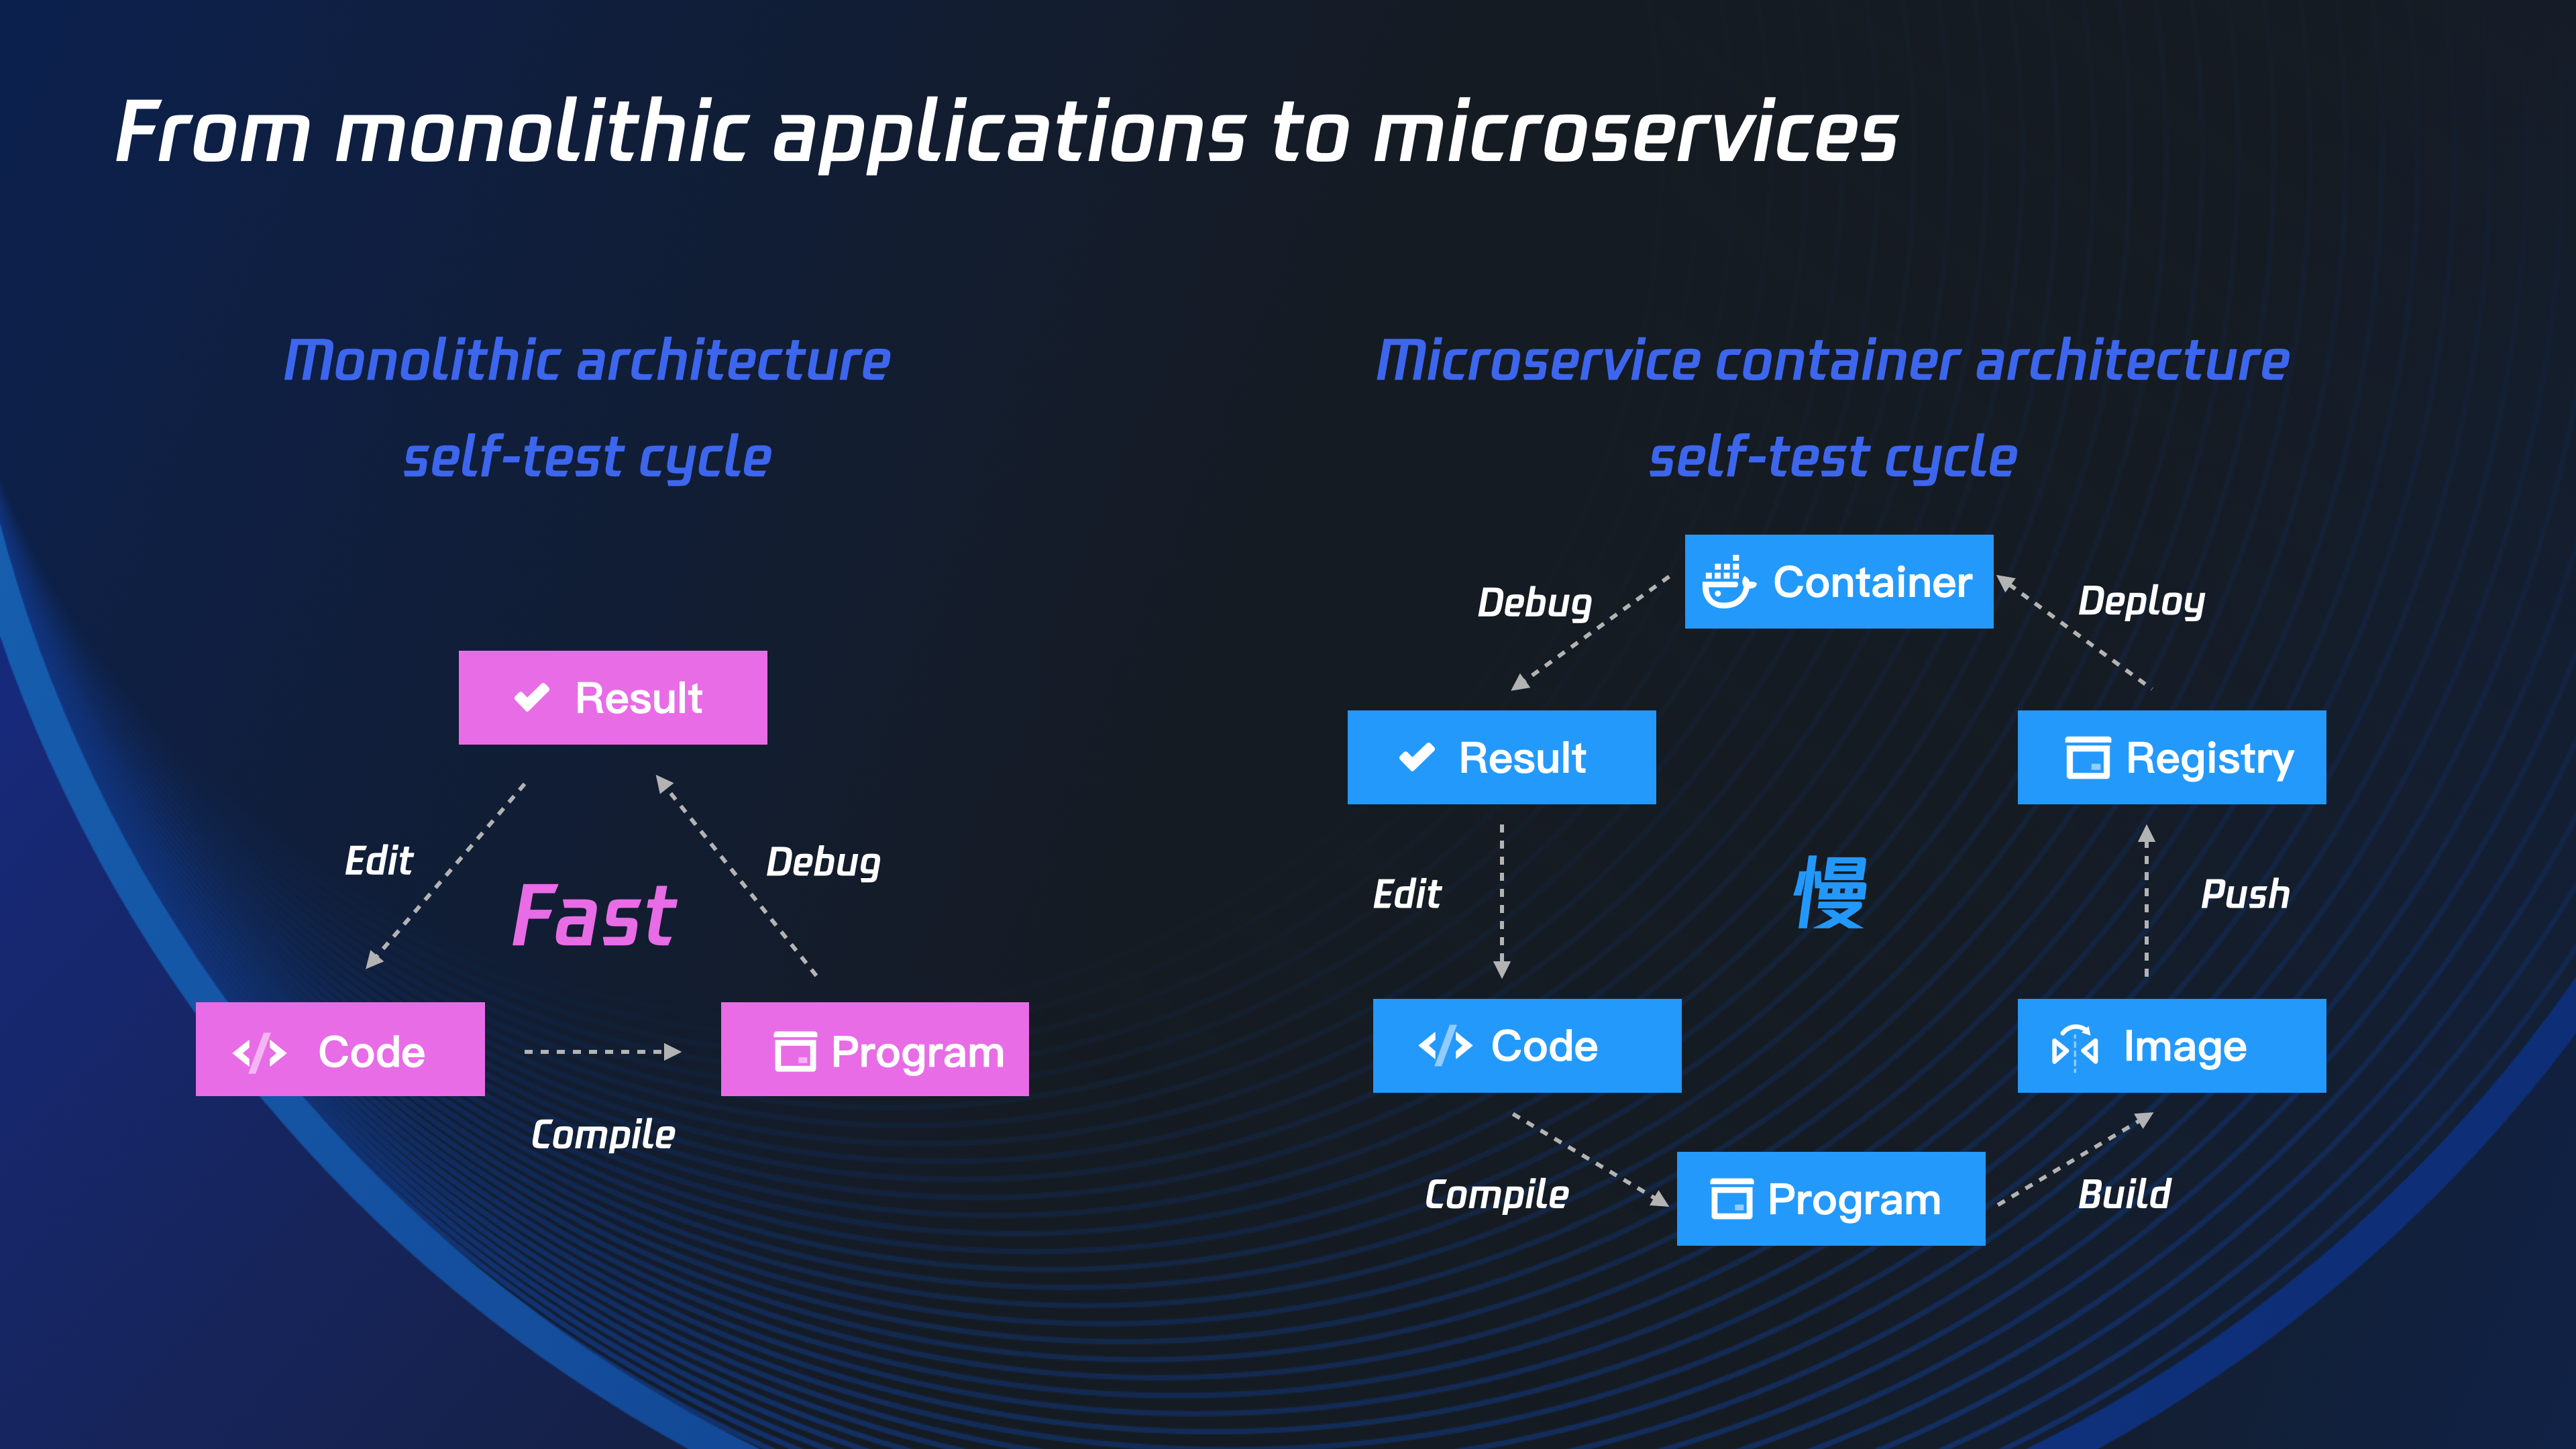
But for developers, the original monolithic application development experience no longer exists. Since the application is difficult to run outside of the Docker container, each code modification needs to go through the following steps:

  • Execute docker build to build the image
  • Execute docker tag to tag the image
  • Execute docker push to push the image to the warehouse
  • Modify the image version of the Kubernetes workload
  • Wait for the mirror pull to end
  • Wait for the Pod to rebuild
  • View the modified code effect

This directly slows down the cyclic feedback process of development, and each modification requires several minutes or even ten minutes of waiting time.

Redefine Cloud Native Dev Environment#

Nocalhost is a Cloud Native development environment, hoping to make developing cloud-native applications as primitive and simple as developing a single application.

Nocalhost reorganized the roles and resources involved in the development process:

  • Team manager
  • Developer
  • Application
  • Cluster
  • Development Space

Through the reintegration of these roles and resources, Nocalhost redefines the cloud-native development environment and brings a new cloud-native development experience.

In order to quickly understand the cloud-native development environment redefined by Nocalhost, let us first stand in different roles and see what Nocalhost can bring to them.

Developer:

  • Get rid of the need to rebuild a new image for each modification and long-term loop feedback, and the modified code will take effect immediately.
  • One-click deployment of the development environment, get rid of the limitations of local environment construction and insufficient resources.
  • Link between local IDE editor and development environment, support remote debugging.
  • Graphical IDE plug-in, no need to be familiar with kubectl commands to complete development in cloud native environment.

Manager:

  • Unified management of microservice application packages, reducing application maintenance costs.
  • Unified management of the development environment and cluster, improve the utilization of cluster resources, and have isolation characteristics.
  • Quickly allocate development environment for new employees, and application development can be carried out immediately after the allocation of the environment.
  • Flexible development environment resources can be destroyed when used up, reducing development costs.

Quick Start#

Try to use Nocalhost for the easier and faster cloud-native application development

Taking Nocalhost's built-in Demo: Bookinfo as an example, the development of Productpage microservices has become the following simple steps:

  1. Connect to remote Kubernetes cluster by click
  2. Select the workload that need to develop, enter development mode
  3. Nocalhost IDE plugin will automatically sync the source code to remote DevContainer
  4. Change the code and see the change under seconds without rebuild image or restart remote POD.

Landing case#

Currently, Tencent Cloud CODING DevOps (nearly 200 microservices) is using Nocalhost for development. Practice has verified that Nocalhost can greatly improve development efficiency and shorten feedback loops.

Open source and community co-construction#

Nocalhost is currently fully open source and has entered CNCF Landscape: https://landscape.cncf.io/

Our Github Repo.

We are using Apache-2.0 open source agreement, can use unlimited free.

For more information about Nocalhost, please visit our documentations.