跳转至主要内容

配置方式

Overview / 配置方式


除了将配置放入 IDE 插件的 DevConfig (右键单击工作负载),Nocalhost 还支持将其放入源代码目录、 ConfigMap 或 Annotation 中。 例如可以将 Nocalhost 配置流程化地配置在 CD 、或者配置在 helm chart、rawManifest 中,通过上述的几种配置方式,来避免重复配置。

PRE-REQUIRE

请确保你已经知晓如何正确进行 Nocalhost 配置, 如果还不知道如何配置,可以先阅读 Nocalhost Overview


零配置#

零配置意味着进入 DevMode 时不需要任何 Nocalhost 配置。 唯一需要的是选择或填写一个开发镜像。
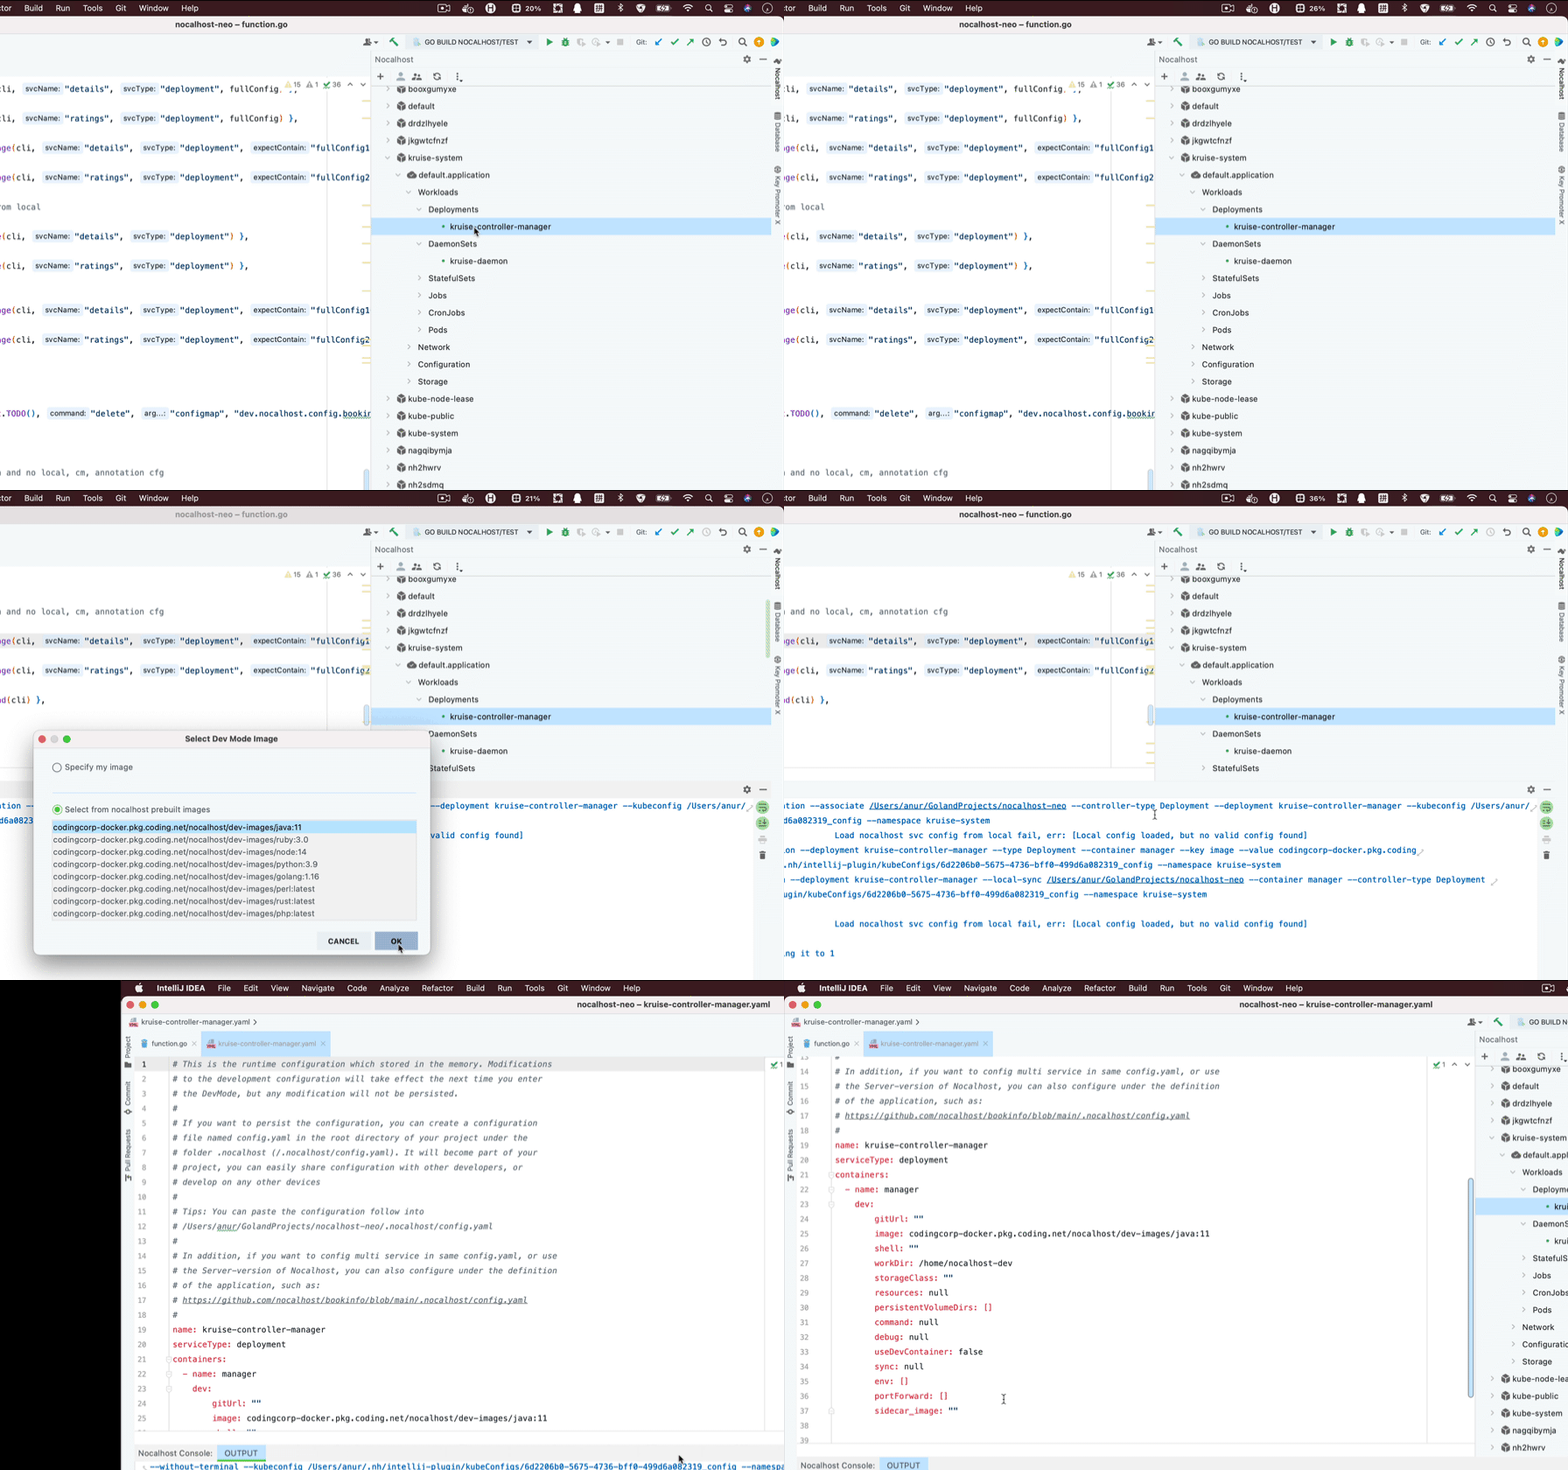
⭐️   零配置进入开发模式   ⭐️

零配置的行为期望#

为什么要关心对行为的期望?

在零配置中,你通常不需要关注 Nocalhost 做了什么。 然而,如果以下行为不能满足你的预期,这时候你需要配置Nocalhost来进行定制。


  • 在容器中使用 /home/nocalhost-dev 作为文件同步的目标目录。
  • 使用以下顺序顺延来尝试进入开发容器,zsh、bash、sh。
  • 不启用持久化,你在开发容器内产生的本地数据将在容器关闭或重启后丢失。
  • 无法使用一键运行和调试
  • 同步所选同步目录的所有内容到容器内

将配置放置在源码目录中#

Nocalhost 支持将配置放置在源码目录中,由有经验的开发者将配置固化在源码目录中,便于团队内的其他开发人员共享这些配置。


如何将配置固化到源码中#

你可以先在具体工作负载右键 DevConfig 配置好确保可用后, 将其直接复制,如:

name: nocalhost-api
serviceType: deployment
containers:
- name: nocalhost-api
dev:
image: nocalhost-docker.pkg.coding.net/nocalhost/dev-images/golang:zsh
env:
- name: NOCALHOST_INJECT_DEV_ENV
value: WHATEVER

在相应的源码目录下,创建 .nocalhost 目录,再在这个目录下创建 config.yaml, 将复制内容保存进去即可。


配置生效了吗?#

再次右键点击此工作负载,然后点击 DevConfig。 如果配置已从本地目录读取,会在最上方看到类似提示,它会提示你这个配置是一个本地文件的副本:

# Tips: This configuration is a in-memory replica of local file:
#
# '/Users/anur/GolandProjects/nocalhost/.nocalhost/config.yaml'
#
# You should modify your configuration in local file, and the modification will
# take effect immediately. (Dev modification will take effect the next time you enter the DevMode)
#
# In addition, if you want to config multi service in same config.yaml, or use
# the Server-version of Nocalhost, you can also configure under the definition
# of the application, such as:
# https://github.com/nocalhost/bookinfo/blob/main/.nocalhost/config.yaml
#

Q&A#

::::tip 当你忘记了工作负载关联到了哪个本地目录

右键具体服务点击 Open Project 可以打开关联过的目录,或点击 Associate Local DIR 重新关联某个新目录。

:::


多个服务都放置在同一个源码中怎么办?

可以同时配置多个服务。 只需要将某个服务的配置内容增加一个层级,并将其变成数组即可:

- name: nocalhost-api
serviceType: deployment
containers:
- name: nocalhost-api
dev:
image: nocalhost-docker.pkg.coding.net/nocalhost/dev-images/golang:zsh
env:
- name: NOCALHOST_INJECT_DEV_ENV
value: WHATEVER
- name: nocalhost-web
serviceType: deployment
containers:
- name: nocalhost-web
dev:
image: nocalhost-docker.pkg.coding.net/nocalhost/dev-images/golang:zsh

:::


将配置放置在 Configmap 中#

Nocalhost 支持将配置放置在 Configmap 中,这样做利于与环境做定制化关联。 例如,在测试环境的部署脚本或 CD 中,定制化的写入某些配置等。


如何配置到 Configmap 中#

我们来看一下,这是一段十分通用的 Nocalhost 配置 helm 模板, 当然,你不一定要使用 helm,这里只是为了便于讲解。

apiVersion: v1
kind: ConfigMap
metadata:
name: "dev.nocalhost.config.{{ .Release.Name }}"
labels:
dep-management: nocalhost
annotations:
"helm.sh/hook": pre-install
data:
config: |-
{{ .Files.Get .Values.nocalhost.config.path | nindent 4 }}

什么是 {{ .Release.Name }}

我们可以看到这个 configmap 中,有两个内容是通过占位符的方式引入的。 第一个是第四行的 {{ .Release.Name }},这是应用的名字, 如果你使用 Helm 或者 Nocalhost 进行应用安装,这里需要填入对应的应用名字,否则则固定写死 default.application


什么是 {{ .Files.Get .Values.nocalhost.config.path | nindent 4 }}

这部分实际上就是 Nocalhost config 该填入的位置,注意前面要四个缩进。


了解了上面的占位符所对应的内容后,实际的 configmap 应为如下格式:

apiVersion: v1
kind: ConfigMap
metadata:
name: "dev.nocalhost.config.default.application"
labels:
dep-management: nocalhost
annotations:
"helm.sh/hook": pre-install
data:
config: |-
- name: nocalhost-api
serviceType: deployment
containers:
- name: nocalhost-api
dev:
image: nocalhost-docker.pkg.coding.net/nocalhost/dev-images/golang:zsh
env:
- name: NOCALHOST_INJECT_DEV_ENV
value: WHATEVER
- name: nocalhost-web
serviceType: deployment
containers:
- name: nocalhost-web
dev:
image: nocalhost-docker.pkg.coding.net/nocalhost/dev-images/golang:zsh

Configmap 配置的注意事项#

:::dangue 注意

  1. 命名规则,它的命名规则必须是 dev.nocalhost.config.${appName},也就是 name: "dev.nocalhost.config.{{ .Release.Name }}"

  2. 标签,它需要有一个标签键值对,固定写死为 dep-management: nocalhost

  3. config 以文本块的方式放置在 data.config 下,注意配置整体缩进。

:::


配置生效了吗?#

当配置好上述 Configmap 后,我们可以再次右键这个服务,选择 DevConfig, 如果看到以下提示,提示配置是 Configmap 的一个副本,则代表配置已经生效:

# Tips: This configuration is a in-memory replica of configmap:
#
# 'dev.nocalhost.config.default.application'
#
# You should modify your configuration in configmap, and the modification will
# take effect immediately. (Dev modification will take effect the next time you enter the DevMode)
#


将配置放置在 Annotations 中#

Nocalhost 同样支持将配置放置在 Annotations 中,与 Configmap 配置的出发点基本一致。


如何配置到 Annotations 中#


同样,我们以一段 helm 模板来进行讲解,它会利于讲解哪些值是应该被定制化的,以及它的格式要求如何等。

apiVersion: apps/v1
kind: Deployment
metadata:
name: nocalhost-api
annotations:
dev.nocalhost: |-
{{ .Files.Get .Values.nocalhost.annotations.path.authors | nindent 6 }}

Annotations 的配置非常简单, 它只需要声明一个 annotation, key 固定为 dev.nocalhost ,值为一个文本块,且需要固定 6 个缩进。 如下所示:

apiVersion: apps/v1
kind: Deployment
metadata:
name: nocalhost-api
annotations:
dev.nocalhost: |-
name: nocalhost-api
serviceType: deployment
containers:
- name: nocalhost-api
dev:
image: nocalhost-docker.pkg.coding.net/nocalhost/dev-images/golang:zsh
env:
- name: NOCALHOST_INJECT_DEV_ENV
value: WHATEVER

由于一个工作量不会有多个配置,因此没有必要将其声明为数组 (尽管数组也被支持)。

且配置所绑定的工作负载已经固定(不管是 Deployment、StatefulSet、DaemonSet 还是什么其他的),所以不需要申明其名字与类型。 如下所示:

apiVersion: apps/v1
kind: Deployment
metadata:
name: nocalhost-api
annotations:
dev.nocalhost: |-
containers:
- name: nocalhost-api
dev:
image: nocalhost-docker.pkg.coding.net/nocalhost/dev-images/golang:zsh
env:
- name: NOCALHOST_INJECT_DEV_ENV
value: WHATEVER

Annotations 配置的注意事项#

注意
  1. Key 必须是 dev.nocalhost,值则为 Nocalhost Config 的文本块。

  2. 注意整体缩进。


配置生效了吗?#

当配置好上述 Annotations 后,我们可以再次右键这个服务,选择 DevConfig, 如果看到以下提示,则代表配置已经生效。

# Tips: This configuration is a in-memory replica of annotation:
#
# annotations:
# dev.nocalhost: |
# [Your Config]
#
# You should modify your configuration in resource's annotation', and the modification will
# take effect immediately. (Dev modification will take effect the next time you enter the DevMode)
#


使用本地、Configmap、Annotations 配置的特性#


配置的粒度与优先级#

Nocalhost 配置支持 “混搭”,例如拥有十个服务,可以其中三个用本地配置,三个用 Configmap 配置,三个使用 Annotations 配置,剩下一个零配置。

如果对同一个服务同时配置了多种配置方式,优先级如下:

Local > Annotations > Configmap > in DevConfig


配置的读取时机#

在使用 Nocalhost 配置之前,Nocalhost 都会检查各种配置方式,并尝试进行读取, 也就是可以认为配置的 读取 是 “实时生效” 的。


配置的固有特性#

请参考 Nocalhost 开发配置的特性